| |
Introduction
|
| |
| e-con Systems is a leading Camera solutions supplier offering camera modules, camera drivers for Linux, Windows Embedded and Android, camera module customization, USB camera solutions etc. e-con's ystems.com/See3CAM-USB-3-Camera.asp">See3CAM family of USB 3.0 Camera solutions is very popular in the Industrial, consumer and medical applications. |
| |
| The See3CAM family of USB 3.0 cameras are UVC compliant and don't need any special drivers to be installed on the PC or the host side. This is an important feature that enables the customers to use these UVC compliant cameras on almost any platform. In this document, e-con is demonstrating and explaining how to use the See3CAM family of cameras with NVIDIA Jetson TK1 Development kit. |
| |
|
The NVIDIA Jetson TK1 Development kit is the world's first mobile supercomputer for embedded systems and opens the door for embedded system designs to harness the power of GPU-accelerated computing.
Some of the key features of the Tegra K1 SoC (System-on-a-Chip) architecture are:
| |
- 4-PLUS-1 Cortex A15 "r3" CPU architecture that delivers high performance.
- Kepler GPU architecture that utilizes 192 CUDA cores to deliver advanced graphics capabilities, GPU computing with NVIDIA CUDA 6 support, breakthrough power efficiency and performance for GPU-accelerated computing applications.
- Advanced Display Engine that is capable of simultaneously driving both a 4K local display and a 4K external monitor via HDMI.
|
|
| |
As a natural curiosity, e-con team explains about the necessary steps for enabling USB 3.0 and utilizing all the features of See3CAM products on a Jetson TK1 Development Kit.This document contains information about the tested See3CAM devices on the Jetson TK1 running different versions of Linux4Tegra (L4T) available from NVIDIA download center.
These data are collected by streaming the See3CAM device in all supported resolutions. During this testing only one See3CAM camera is connected to the host controller. The software used for streaming is see3camguvcview (version 1.7.2-s2.33). Also we used USB 3.0 cable of length 2-meters. The tested devices on the Jetson TK1 Development kit are: |
| |
| |
|
- See3CAM_CU30 : 3.4 MP Low Light USB Camera Board based on AR0330 sensor from ON Semiconductor.

- See3CAM_CU130 : 13 MP Custom Lens 4K USB 3.0 Camera board based on AR1820HS sensor from Aptina.
- See3CAM_10CUG_C : Bayer color version of See3CAM_10CUG range with the same functionalities.
- See3CAM_10CUG_M : 1.3 MP Global Shutter Monochrome Camera with 720p HD and support for trigger modes.
- And more to come...
|
|
| |
 |
| |
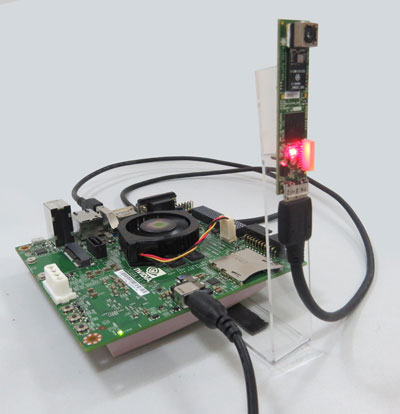
| Figure 1 See3CAM working on Jetson TK1 Kit |
| |
| The rest of the document is written more as a step-by-step guide |
| |
Prerequisites
|
| |
| 1. Downloading the requirements |
| |
| For building the kernel a cross compiler toolchain and other tools necessary for compiling are required. The default one provided in Ubuntu repositories can be used. The necessary tools can be installed by running the command on the host Linux PC: |
| |
| |
|
sudo apt-get install gcc-arm-linux-gnueabihf build-essential
|
|
| |
| Download the required L4T release package and sample root file system from NVIDIA website. |
| |
| L4T 19.3 |
| |
|
|
| |
| Download the corresponding kernel source code for the L4T version from the NVIDIA website. |
| |
| For L4T 19.3 |
| |
|
|
| |
| 2. Extracting and preparing L4T |
| |
| Extract the downloaded L4T release package to get a folder with the name Linux_for_tegra, which contains the necessary tools and binaries for modifying the Jetson TK1. All the following steps should be done on the host PC itself. |
| |
| |
|
sudo tar -xjf Tegra124_Linux_R<L4T_version>_armhf.tbz2
|
|
| |
| Now extract the sample file system to the rootfs directory present inside the obtained Linux_for_Tegra directory. |
| |
| |
|
cd Linux_for_Tegra/rootfs
sudo tar -xjpf <path_to>/Tegra_Linux_Sample-Root-Filesystem_R<L4T_version>_armhf.tbz2
|
|
| |
| Apply the NVIDIA provided libraries and binaries to the extracted file system using the following commands: |
| |
| |
|
cd ..
export LDK_ROOTFS_DIR=<absolute path to Linux_for_Tegra>/rootfs
sudo ./apply_binaries.sh
|
|
| |
Enabling HID support
|
| |
|
The default kernel zImage provided by NVIDIA for the Jetson TK1 does not support hidraw device support. Hidraw support is necessary for accessing the extra controls present in each See3CAM device. To enable hidraw in Jetson, the kernel binary needs to be rebuilt after configuring and enabling HID device support.
|
| |
| 1. Extracting and configuring the kernel |
| |
| Extract the source code to any path on the host Linux PC. |
| |
| |
|
tar -xjf <path_to>/kernel_src.tbz2
cd kernel/
ARCH=arm make tegra12_defconfig
ARCH=arm make menuconfig
|
|
| |
| Now enable hidraw support in the kernel by enabling the option given below. |
| |
| |
|
"Device Drivers -> HID support -> /dev/hidraw raw HID device support".
|
|
| |
| Now save and exit from the menu. |
| |
| 2. Building and installing the kernel |
| |
| Run the following commands in the host PC to build and install the kernel and drivers. |
| |
| |
|
ARCH=arm CROSS_COMPILE=arm-linux-gnueabihf- make zImage
ARCH=arm CROSS_COMPILE=arm-linux-gnueabihf- make modules
sudo ARCH=arm CROSS_COMPILE=arm-linux-gnueabihf- make modules_install INSTALL_MOD_PATH=$LDK_ROOTFS_DIR
sudo cp arch/arm/boot/zImage $LDK_ROOTFS_DIR/boot
sudo cp arch/arm/boot/zImage <path_to>/Linux_for_Tegra/kernel/zImage
|
|
| |
| NOTE: Alternatively, the Grinch kernel (>=19.3.1) can be used which has support for hidraw devices. Refer to the NVIDIA developer forums for more information. |
| |
Enabling USB 3.0 support
|
| |
|
By default, the USB 3.0 port in the Jetson TK1 dev kit works only in USB 2.0 mode. So connecting any USB 3.0 device to that port is not sufficient to utilize the maximum performance that USB 3.0 offers. The following are the steps required to enable USB 3.0 in Jetson TK1 depending upon the version of L4T used.
For L4T 19.3
The default bootloader in this version of L4T is fastboot. For enabling USB 3.0 using this boot loader, the ODMDATA value needs to be changed in the file "jetson-tk1.conf" in Linux_for_Tegra directory and a re-flash is required.
cd Linux_for_Tegra/
Open the file jetson-tk1.conf. Modify the value ODMDATA=0x6009C000 to ODMDATA=0x6209C000 and save the file. Now follow the steps for Flashing the Jetson TK1 (Section 7.1) to enable USB 3.0.
If U-boot is used as bootloader, the file extlinux.conf needs to be modified to get USB 3.0 working. For changing the bootloader to U-boot, refer to section 7.2. The following steps are not required otherwise.
After successfully booting the device, edit the file extlinux.conf in /boot and make the following changes on the Jetson device itself.
The second occurrence of usb_port_owner_info=0 should be changed to usb_port_owner_info=2.
The vmalloc parameter should be set to 512.
Example extlinux.conf file
TIMEOUT 30
DEFAULT primary
MENU TITLE Jetson-TK1 eMMC boot options
LABEL primary
MENU LABEL primary kernel
LINUX zImage
FDT tegra124-pm375.dtb
APPEND console=ttyS0,115200n8 console=tty1 no_console_suspend=1 lp0_vec=2064@0xf46ff000 video=tegrafb mem=1862M@2048M memtype=255 ddr_die=2048M@2048M section=256M pmuboard=0x0177:0x0000:0x02:0x43:0x00 vpr=151M@3945M tsec=32M@3913M otf_key=c75e5bb91eb3bd947560357b64422f85 usbcore.old_scheme_first=1 core_edp_mv=1150 core_edp_ma=4000 tegraid=40.1.1.0.0 debug_uartport=lsport,3 power_supply=Adapter audio_codec=rt5640 modem_id=0 android.kerneltype=normal usb_port_owner_info=0 fbcon=map:1 commchip_id=0 usb_port_owner_info=2 lane_owner_info=6 emc_max_dvfs=0 touch_id=0@0 tegra_fbmem=32899072@0xad012000 board_info=0x0177:0x0000:0x02:0x43:0x00 root=/dev/mmcblk0p1 vmalloc=512M rw rootwait tegraboot=sdmmc gpt
Now reboot the device. The blue colored USB port will work in USB 3.0 mode after the reboot. |
| |
| 1. Flashing the Jetson TK1 |
| |
| Connect the USB cable between the host PC and Jetson TK1 dev kit. Put the board in recovery mode by holding down the RECOVERY button and pressing the RESET button once. If the board is successfully changed to recovery mode, the jetson will be enumerated as an USB device to the host PC. |
| |
| |
|
lsusb
Bus 003 Device 006: ID 0955:7140 NVIDIA Corp
|
|
| |
| Now flash the Jetson TK1 kit using the flash.sh script from your Host PC. |
| |
| |
|
sudo ./flash.sh jetson-tk1 mmcblk0p1
|
|
| |
| Now reboot the device. The blue colored USB port will work in USB 3.0 mode after the reboot. |
| |
| 2. Changing bootloader to U-boot |
| |
| The bootloader can be changed to U-boot also. This step is not mandatory but explains how to change the default bootloader to U-boot in L4T 19.3. A u-boot binary is provided in the NVIDIA provided release package. It is present in Linux_for_Tegra/bootloader/u-boot.bin. The command given below will change the bootloader of the Jetson TK1 dev kit to U-boot. |
| |
| |
|
sudo ./flash.sh -L <full path to u-boot.bin> jetson-tk1 mmcblk0p1
|
|
| |
Improving performance of CPU
|
| |
| After flashing the kernel and modules, the board can be successfully booted with full support for hidraw and USB 3.0. The default CPU governor on the Jetson TK1 is ondemand. Changing the CPU governor to performance provides better overall performance of the system and also improves rendering at high frame rates as well. The following commands should be run on the target device. |
| |
| |
|
sudo su
echo performance > /sys/devices/system/cpu/cpu0/cpufreq/scaling_governor
exit
|
|
|
See3camguvcview
|
| |
| See3camguvcview is our linux application to demonstrate all the features of See3CAM USB 3.0 devices. This software is available to anyone who purchases any of our See3CAM devices. Contact sales@e-consystems.com or visit our website www.e-consystems.com for more info. |
| |
1.1 Dependencies
| |
|
- libavutil-dev
- libavcodec-dev
- libusb-1.0-0-dev
- libv4l-dev
- libgtk-3-dev
- libsdl1.2-dev
- portaudio19-dev
- libudev-dev
- intltool
|
|
| |
|
Install them all by running the following command on the Jetson TK1 dev kit:
sudo apt-get update && sudo apt-get install intltool libudev-dev libsdl1.2-dev libgtk-3-dev
libv4l-dev libusb-1.0-0-dev portaudio19-dev libavcodec-dev
|
| |
1.2 Installing see3camguvcview from source code
|
| |
|
The source code of the see3camguvcview application can be obtained from e-con systems when you buy any See3CAM device.
|
| |
| |
|
- Extract the source code using
tar -xvzf <path to tar file>/See3CAM_LINUX_REL_Package_xxxx.tar.gz
- Enter in to the source directory by the command
cd See3CAM_LINUX_REL_Package_xxxx/src/See3CAM_guvcview-src-1.7.2/
- To avoid the application causing any issues due to portaudio issues in the Jetson kit, edit the file src/guvcview.c as follows:
comment the line Pa_Initialize();
comment the line audio_tab (&all_data);
- Now run the following commands in order to install see3camguvcview.
./configure && make && sudo make install
|
|
| |
1.3 Running see3camguvcview
|
| |
|
Connect any See3CAM device to the USB 3.0 port of the Jetson TK1 Development Kit and run the following command in a terminal window.
sudo see3camguvcview
The following image shows see3camguvcview running in the Jetson TK1 development Kit. The preview is from e-con's See3CAM_80 camera connected in USB 3.0 streaming 1080p at 30fps.
|
| |
 |
| |
1.4 Test results
|
| |
| The following table summarizes the performance of tested See3CAM devices on the Jetson TK1 dev kit. |
| |
| |
| Device Name |
Mode
|
Format
|
Resolution
|
Actual fps
|
Observed fps
|
|
See3CAM_10CUG_M
|
USB 3.0
|
YUYV
|
|
1280x960
|
45
|
45
|
|
1280x720
|
60
|
58
|
|
640x480
|
45
|
45
|
|
|
USB 2.0
|
YUYV
|
|
1280x960
|
9
|
9
|
|
1280x720
|
12
|
12
|
|
640x480
|
30
|
30
|
|
|
See3CAM_10CUG_M
|
USB 3.0
|
GREY
|
|
1280x960
|
45
|
45
|
|
1280x720
|
60
|
60
|
|
640x480
|
45
|
45
|
|
|
USB 2.0
|
GREY
|
|
1280x960
|
9
|
9
|
|
1280x720
|
12
|
12
|
|
640x480
|
30
|
30
|
|
|
See3CAM_10CUG_C
|
USB 3.0
|
BA81
|
|
1280x960
|
45
|
20
|
|
1280x720
|
60
|
25
|
|
640x480
|
45
|
45
|
|
|
USB 2.0
|
BA81
|
|
1280x960
|
9
|
9
|
|
1280x720
|
12
|
12
|
|
640x480
|
30
|
30
|
|
|
See3CAM_11CUG
|
USB 3.0
|
YUYV
|
|
1280x960
|
20
|
20
|
|
1280x720
|
30
|
30
|
|
640x480 (Binned)
|
30
|
30
|
|
640x480 (Cropped)
|
60
|
60
|
|
|
USB 2.0
|
YUYV
|
|
1280x960
|
8
|
8
|
|
1280x720
|
12
|
12
|
|
640x480 (Binned)
|
30
|
30
|
|
640x480 (Cropped)
|
30
|
30
|
|
|
See3CAM_12CUNIR
|
USB 3.0
|
Y16
|
|
1280x960
|
45
|
35 - 40
|
|
1280x720
|
60
|
55
|
|
640x480 (Binned)
|
45
|
45
|
|
640x480 (Cropped)
|
60
|
60
|
|
|
USB 2.0
|
Y16
|
|
1280x960
|
9
|
9
|
|
1280x720
|
12
|
12
|
|
640x480 (Binned)
|
30
|
30
|
|
640x480 (Cropped)
|
30
|
30
|
|
|
See3CAMCU50
|
USB 3.0
|
YUYV
|
|
2592x1944
|
8
|
8
|
|
1920x1080
|
15
|
15
|
|
1280x720
|
30
|
30
|
|
640x480
|
30
|
30
|
|
|
USB 3.0
|
MJPG
|
|
2592x1944
|
15
|
15
|
|
1920x1080
|
30
|
30
|
|
1280x720
|
60
|
60
|
|
640x480
|
60
|
60
|
|
|
See3CAM_80
|
USB 3.0
|
YUYV
|
|
3264x2448
|
11
|
11 (Preview is distorted)
|
|
1920x1080
|
30
|
30
|
|
1280x720
|
30
|
30
|
|
640x480
|
30
|
30
|
|
|
USB 2.0
|
YUYV
|
|
3264x2448
|
1.5
|
1.5
|
|
1280x720
|
10
|
10
|
|
|
See3CAM_CU30
|
USB 3.0
|
UYVY
|
|
1280X720
|
|
|
1920X1080
|
|
|
2304X1296
|
30
|
1
|
|
2304X1536
|
24
|
0
|
|
|
USB 3.0
|
MJPG
|
|
1280X720
|
42
|
41
|
|
1920X1080
|
20
|
19
|
|
2304X1296
|
14
|
13
|
|
2304X1536
|
12
|
11
|
|
|
See3CAM_CU130
|
USB 3.0
|
YUYV
|
|
4224x3156
|
5
|
4
|
|
3840x2160
|
9
|
8
|
|
1920x1080
|
13
|
1
|
|
1280x720
|
60-23
|
not constant(60-0)
|
|
640x480
|
60
|
60
|
|
|
USB 3.0
|
MJPG
|
|
4224x3156
|
4
|
3
|
|
3840x2160
|
6
|
5
|
|
1920x1080
|
19
|
18
|
|
1280x720
|
43
|
43
|
|
640x480
|
60
|
60
|
|
|


 Mr. Thomas Yoon
 +82-10-5380-0313