e-con Systems is a leading Camera solutions supplier offering camera modules, camera drivers for Linux, Windows Embedded and Android, camera module customization, USB camera solutions etc. e-con's See3CAM family of USB 3.0 Camera solutions is very popular in the Industrial, consumer and medical applications. e-con has a wide of USB 3.0 camera solutions as part of the See3CAM family as listed below:
See3CAM_10CUG : Industrial Camera solutions featuring Global Shutter CMOS image sensor and available with monochrome and raw Bayer RGB formats
See3CAM_CX3RDK : A reference design kit (RDK) developed for CX3 chip from Cypress Semiconductors. This RDK is available with a few accessories as well.
And more to come...
The See3CAM family of USB 3.0 cameras are UVC compliant and don't need any special drivers to be installed on the PC or the host side. This is an important feature that enables the customers to use these UVC compliant cameras on almost any platform. In this document, e-con is demonstrating and explaining how to use the See3CAM family of cameras with Samsung Exynos-5 Octa based ODROID-XU platform.
The Samsung Exynos-5 Octa is a octal core CPU (Cortex™-A15, 1.6GHz quad core and Cortex™-A7 quad core CPUs) CPU. The ODROID-XU board from Hardkernel (www.hardkernel.com) is based on this Samsung Exynos-5 Octa CPU. This ODROID-XU is the world's first big.LITTLE architecture based bare-board computer. One of the important features relating to USB connectivity is that this board (and hence the Exynos-5 Octa CPU) has a USB 3.0 host controller built-in and as of now this is the only non-Intel CPU based board with USB 3.0 host controller interface.
As a natural curiosity, e-con team wanted to demonstrate the UVC-compliant See3CAM family of cameras working with the ODROID-XU board. This article has become more if a step-by-step instructional manual to get the See3CAM family of cameras working with this ODROID-XU kit.
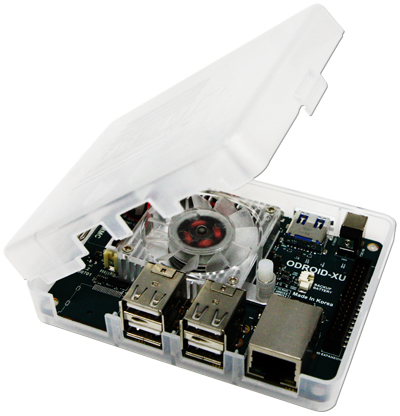
Figure 1 ODROID-XU
The ODROID-XU board is shown above and this board can run various flavors of Linux, including Ubuntu and the Android 4.2. For the purposes of our demonstration, e-con has chosen the Ubuntu Linux running on the ORDRID-XU as the OS of choice.
The rest of the document is written more as a step-by-step guide
Getting Started
Initial setup involves setting up the board to run Ubuntu. A clean version of Ubuntu 12.04 (LTS) for arm big.LITTLE architecture can be downloaded from the Hardkernel website.
Download the Ubuntu image file for ODROID-XU to your development PC running Ubuntu.
where, sd* is the node created when the eMMC is mounted.
Note :
The Unity (GUI) in the Ubuntu 12.10/13.04/13.10 don't support the 2D/3D renderer on the ARM platform.
Now disconnect the eMMC from the PC and remove the eMMC module from the eMMC to MicroSD adapter. Connect the eMMC module to the ODROID-XU in the proper slot. This slot will be in between the CPU fan connector and the UART connector. Once it is properly inserted you will hear a click.
Make sure both the boot switches are set to ON so that the board boots from eMMC.
Now connect the required peripherals (keyboard, mouse and Ethernet cable) to the USB 2.0 ports and power on the device by connecting the 5V/4A adaptor to the board.
After the board has booted up connect the Full-size HDMI Type A to Micro-size Type D cable to the HDMI display to see the login screen of Ubuntu.
Login using the password "odroid" for the user odroid.
Kernel Update
Now that you have logged into Ubuntu on ODROID-XU, open a terminal window using the keyboard shortcut ‘Ctrl+Alt+T'.
Run the following commands in the terminal window to update the kernel zImage.
The script above will download the latest version, build every midnight and install on your board.
Utilizing the A15 cores alone
The kernel supports switching between A7 and A15 cores on the fly depending upon the CPU usage. To disable this and utilize only the A15 cores of the Exynos 5 chipset, simply change the scaling governor to performance as the root user.
sudo su echo performance > /sys/devices/system/cpu/cpu0/cpufreq/scaling_governor
Note :
The current core in use can be found by
cat /proc/cpuinfo | grep "CPU part"
If CPU part is 0xc07 the A7 core is in use. If CPU part is 0xc0f the A15 core is in use.
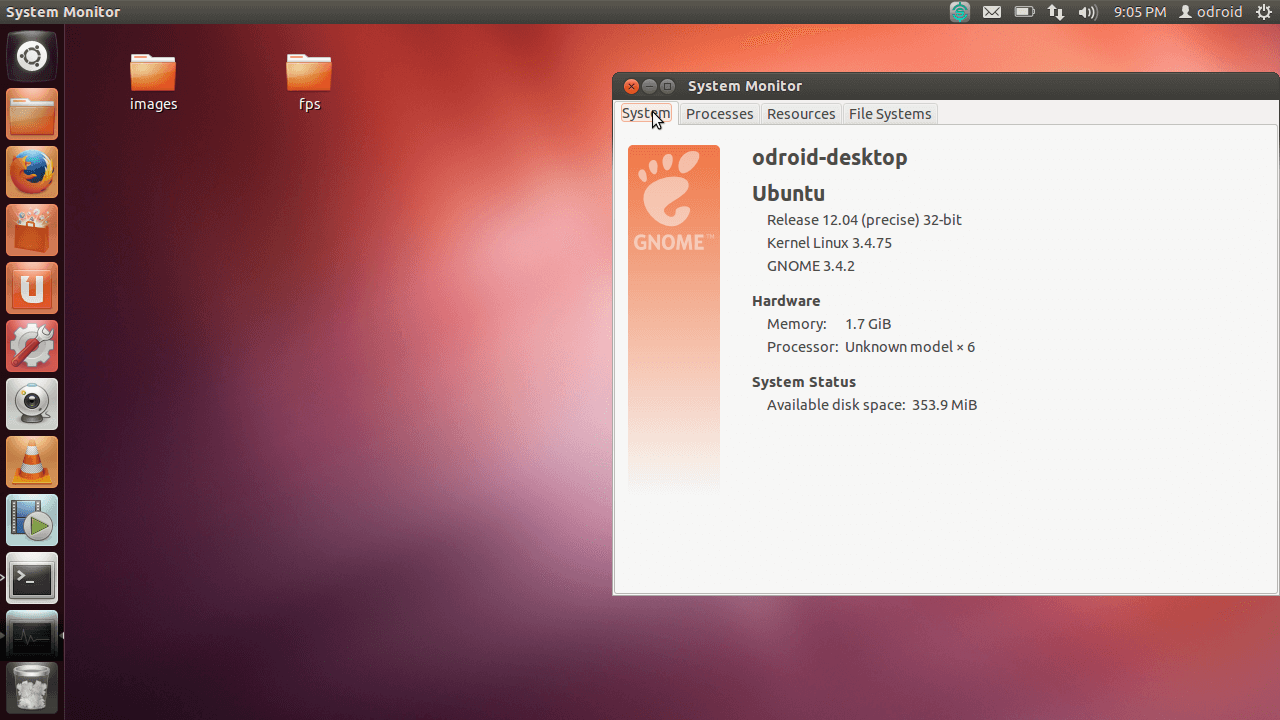
Running System Monitor
System monitor shows 32 bit version of Ubuntu 12.04 (LTS). Kernel version is 3.4.75
All four cores are visible in the resources tab of system monitor.
See3camguvcview
See3camguvcview is our linux UVC camera application to demonstrate all the features of our See3CAM family of cameras.
1.1 Dependencies
libavutil-dev (download .deb file from canonical repos independently and install first)
libavcodec-dev (download .deb file from canonical repos independently and install first)
libusb-1.0-0-dev
libv4l-dev
libgtk-3-dev (download .deb file from canonical repos independently and install first)
libsdl1.2-dev
portaudio19-dev
libudev-dev
intltool
Install them one by one using the following command :
The source code of the see3camguvcview application can be obtained from e-con systems when you buy any See3CAM device.
Extract the source code using
tar -xvzf <path to tar file>/See3CAM_LINUX_REL_Package_xxxx.tar.gz
Enter in to the source directory by the command
cd See3CAM_LINUX_REL_Package_xxxx/src/See3CAM_guvcview-src-1.7.2/
Now run the following commands in order to install see3camguvcview.
./configure && make && sudo make install
1.3 Running see3camguvcview
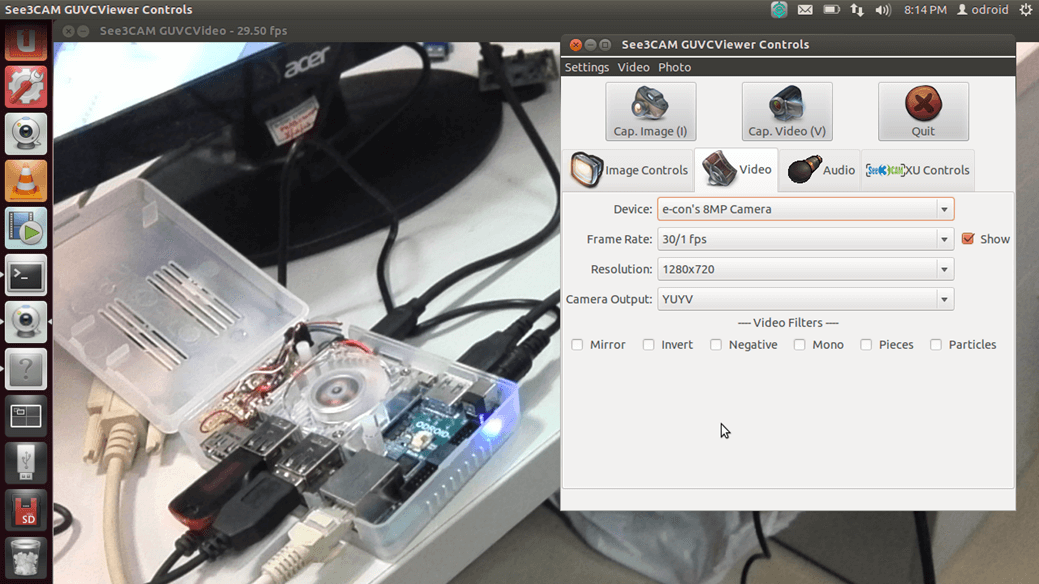
Connect any See3CAM device to the USB 3.0 port of the ODROID-XU and run the following command in a terminal window.
sudo see3camguvcview
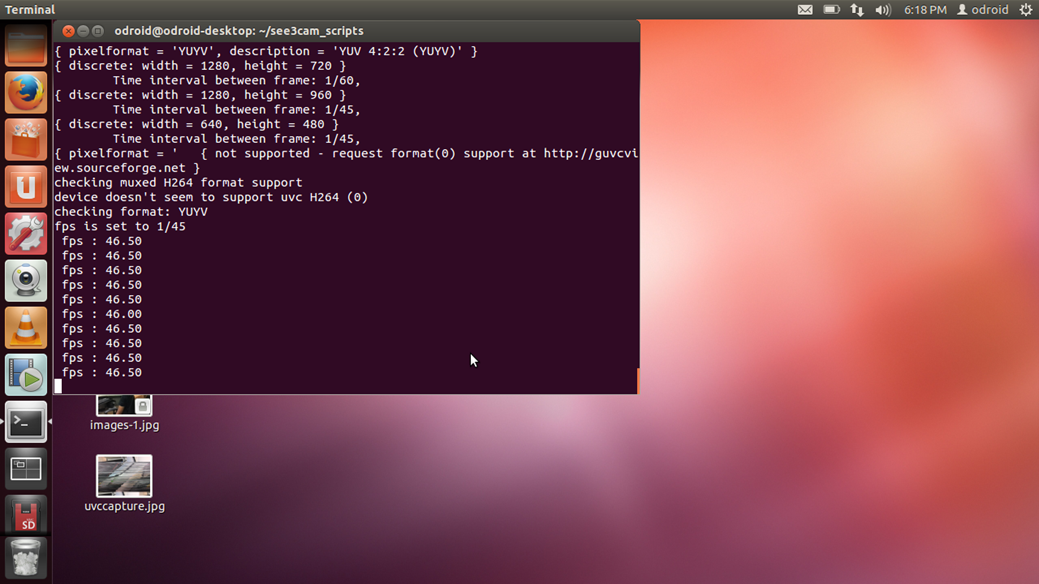
This image shows see3camguvcview running in the ODROID-XU. The preview is from e-con's See3CAM_80 camera connected in USB 3.0 showing 720p at 30fps.
1.4 Test results
The currently tested devices include,
Device Name
Mode
See3CAM_10CUG_M
USB 2.0 and USB 3.0
See3CAM_10CUG_C
USB 2.0 and USB 3.0
See3CAM_11CUG
USB 2.0 and USB 3.0
See3CAM_80
USB 3.0 only
The data shows that due to lack of hardware rendering, at higher resolutions frames are lost and cannot be displayed at the full framerate of the cameras on the screen. The observed data is as follows :
Device Name
Mode
Resolution
Actual fps
Observed fps
See3CAM_10CUG_M
USB 3.0
1280x960
45
26-30*
1280x720
60
36-40*
640x480
45
45
USB 2.0
1280x960
9
9
1280x720
12
12
640x480
30
30
See3CAM_10CUG_C
USB 3.0
1280x960
45
10-12*
1280x720
60
13-15*
640x480
45
40
USB 2.0
1280x960
9
9
1280x720
12
12
640x480
30
30
See3CAM_11CUG
USB 3.0
1280x960
20
20
1280x720
30
30
640x480 (Binned)
30
30
640x480 (Cropped)
60
60
USB 2.0
1280x960
7
7
1280x720
12
12
640x480 (Binned)
30
30
640x480 (Cropped)
30
30
See3CAM_80
USB 3.0
3264x2448
11
11 (preview is distorted)
1920x1080
30
15-20
1280x720
30
30
640x480
30
60
*Please refer section 1.5 to get actual FPS.
Watch video for See3CAMs Streaming 720p @ 30 fps when connected to ODROID's USB 3.0 port
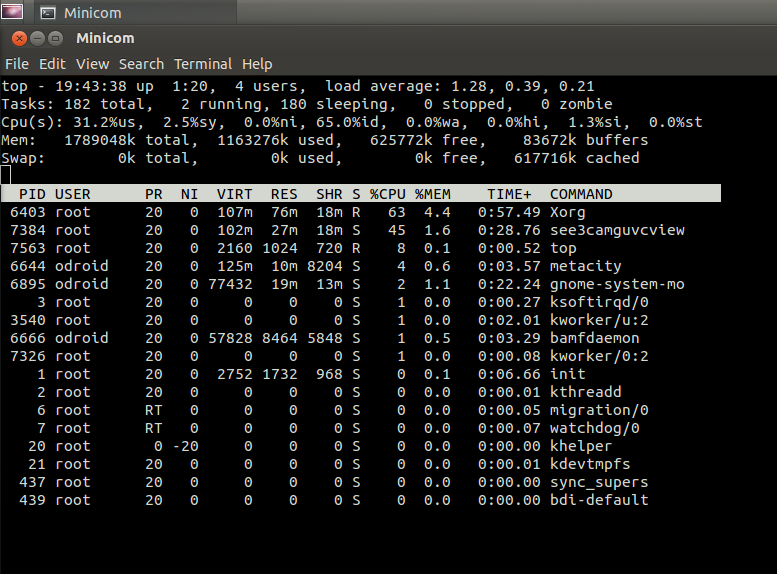
The output from "top -d 1" on the debug terminal is as follows:
It can be noted that the process Xorg takes a lot of CPU usage. The Xorg server provides the GUI for the unity environment. This shows that window rendering is not hardware accelerated in this version of Ubuntu. The team at Hardkernel are working hard for a way to bring hardware rendering support to Ubuntu on the ARM platform using the built-in PowerVR SGX544MP3 GPU on the Exynos 5 SoC.
1.5 Disabling frame rendering in see3camguvcview
Since the GUI in Ubuntu 12.04 doesn't support hardware rendering on ARM platform, we can change the application source code to print the fps at which frames are dequeued from the camera.
Add the following lines to the source code before installing see3camguvcview.
This method prints the current fps at which frames are obtained from the camera in the terminal window once in every 2 seconds. It also saves 100 pictures at 100 second intervals.
1.6 Test results after disabling frame rendering
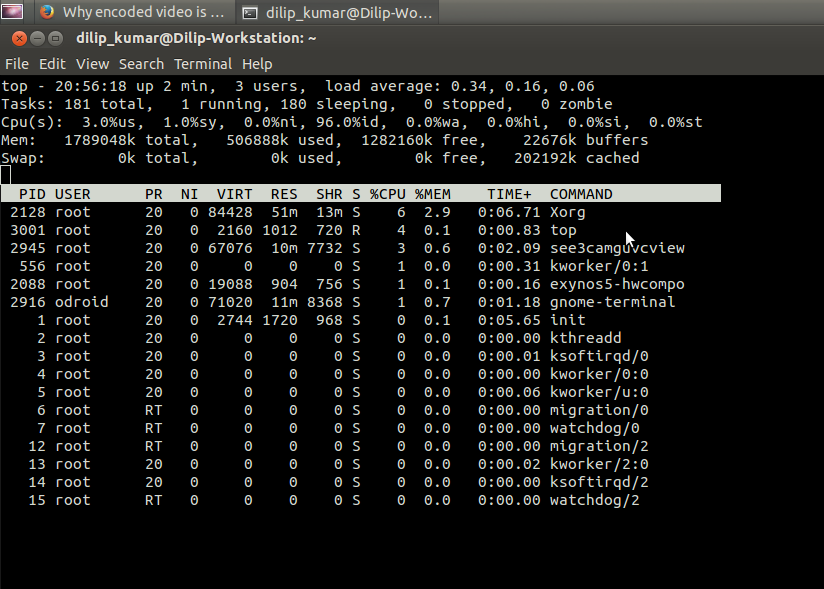
The screenshot shown above was taken when a See3CAM_10CUG_C was streamed without preview at 1280x960 resolution. Its framerate is 45 which is obtained fully when rendering is disabled.
The output from "top -d 1" on the debug terminal now is :
As the image above indicates, the CPU usage is low when rendering is disabled and the camera is also able to give frames at its full frame rate in USB 3.0. Only the rendering process takes a lot of CPU processing power and slows it down. This has been tested and confirmed with other See3CAM devices and resolutions as well.
Conclusion
We tested our See3CAM USB 3.0 devices in ODROID-XU. Only the 8MP@11 fps streaming of See3CAM_80 doesn't work on the ODROID-XU at the time of writing this review. Other than that software rendering also slows down the system and the performance of See3CAM devices.
The libraries and firmware binaries required for the PowerVR SGX544MP3 are available only with Hardkernel as it is vendor specific. If the Hardkernel releases an update for Ubuntu enabling us to harness the power of the embedded GPU we can display the frames at high resolutions and full frame rate as well using the ODROID-XU.
We use cookies to ensure that we give you the best experience on our website. You can change your cookie settings at any time but our site requires cookies to function properly.
You may not be able to access content or other services correctly without cookies. Know more
We use cookies to ensure that we give you the best experience on our website.


 Mr. Thomas Yoon
 +82-10-5380-0313