Using OpenCV with Jetson TK1 Camera
by Dilip Kumar J
Introduction
The e-CAM130_CUTK1 is a 13.0 Mega Pixel, 4-lane MIPI CSI-2 Camera solution for NVIDIA Tegra K1 CPU. This 13MP MIPI Camera supports 5 resolutions ranging from 4224x3156 (13MP) to VGA resolution in both uncompressed YUYV and compressed MJPG formats. e-CAM130_CUTK1 - 13MP Jetson TK1 camera board supports various controls such as brightness, contrast, sharpness etc. to modify camera preview as per requirements.
OpenCV (Open Source Computer Vision) is a library of programming functions mainly aimed at real-time computer vision. The library is cross-platform. Written in optimized C/C++, the library can take advantage of multi-core processing. Enabled with CUDA, it can take advantage of the hardware acceleration of the underlying heterogeneous compute platform. It mainly focuses on real-time image processing. Usage ranges from interactive art, to mines inspection, stitching maps on the web or through advanced robotics.
This Article briefs the following:
- How to use the high resolution frames from e-CAM130_CUTK1 along with OpenCV on the Jetson TK1.
- How to install cuda.
- How to enable cuda accelerations in OpenCV.
- How to build a sample OpenCV application on the Jetson TK1.
Scope
This Article is intended as a getting started guide for application developers who wish to use the images from e-CAM130_CUTK1 MIPI-CSI2 camera with OpenCV on the Jetson TK1. Note that all the steps mentioned in this Article are to be done on the Jetson TK1 board itself.
Prerequisites
It is assumed that the Jetson board is flashed with Linux for Tegra 21.2 and the e-con provided binaries for e-CAM130_CUTK1 - 13MP MIPI camera are already installed. Make sure that the camera is working fine with the sample app "ecam_tk1_guvcview" which is also provided by e-con.
Installing CUDA
CUDA is a GPGPU acceleration library which uses the GPU on the Tegra K1 processor for accelerating certain algorithms in OpenCV. It is a requirement for using the OpenCV library with accelerations enabled.
It can be downloaded from the following website:
CUDA 6.5 Toolkit for L4T Rel 21.2
It can be installed using the following commands:
    $ sudo dpkg -i cuda-repo-<distro>_<version>_<architecture>.deb
    $ sudo apt-get update
    $ sudo apt-get install cuda-toolkit-6-5
Installing OpenCV
There are two methods for obtaining OpenCV in the Jetson TK1.
- Installing prebuilt OpenCV4tegra library for Jetson TK1 from NVIDIA.
- Building standard OpenCV from source code.
1.1 Prebuilt OpenCV4tegra
OpenCV4Tegra is a CPU & GPU optimized version of OpenCV, available as a prebuilt library. It can be installed in the Jetson TK1 board by using the .deb file provided by NVIDIA for arm hardfloat architecture.
It can be downloaded from the following website:
OpenCV4Tegra for L4T 21.x
It can be installed using the following commands:
	$ sudo apt-add-repository universe
	$ sudo dpkg -i libopencv4tegra-repo_l4t-r21_2.4.10.1_armhf.deb
	$ sudo apt-get update
	$ sudo apt-get install libopencv4tegra libopencv4tegra-dev
This will install OpenCV4tegra libraries in its default location: /usr/lib/
NOTE:
While testing this library, we noted that it was not possible to change the resolution of the camera.
1.2 Building from source code
OpenCV is an open source library and hence the source code can be downloaded by anybody. This option allows the user to customize or patch OpenCV as per their needs. Also the 'gpu' module of OpenCV contains code which is designed specifically for CUDA GPGPU acceleration with NVIDIA's GPUs.
OpenCV source code can be downloaded from the following website:
OpenCV for Linux/Mac version 2.4.9
1.2.1 Dependencies
Install the following dependencies for compiling OpenCV.
# Some general development libraries
$ sudo apt-get install build-essential make cmake cmake-curses-gui g++
# libav video input/output development libraries
$ sudo apt-get install libavformat-dev libavutil-dev libswscale-dev
# Video4Linux camera development libraries
$ sudo apt-get install libv4l-dev
# Eigen3 math development libraries
$ sudo apt-get install libeigen3-dev
# OpenGL development libraries (to allow creating graphical windows)
$ sudo apt-get install libglew-dev
# GTK development libraries (to allow creating graphical windows)
$ sudo apt-get install libgtk2.0-dev
1.2.2 Configure
OpenCV can be built and installed using the following commands:
	$ unzip opencv-2.4.9.zip
	$ cd opencv-2.4.9
	$ mkdir build && cd build
	$ cmake -DWITH_CUDA=ON -DCUDA_ARCH_BIN="3.2" -DCUDA_ARCH_PTX=""
	-DBUILD_TESTS=OFF -DBUILD_PERF_TESTS=OFF ..
1.2.3 Patching OpenCV
The OpenCV version 2.4.9 and cuda version 6.5 are not compatible. It requires a few modifications in OpenCV.
Edit the file <opencv_dir>/modules/gpu/src/nvidia/core/NCVPixelOperations.hpp in the opencv source code main directory.
Remove the keyword "static" from lines 51 to 58, 61 to 68 and from 119 to 133 in it. This is an example:
Before:
	template<> static inline __host__ __device__ Ncv8u  _pixMaxVal<Ncv8u>()  {return UCHAR_MAX;}
	template<> static inline __host__ __device__ Ncv16u _pixMaxVal<Ncv16u>() {return USHRT_MAX;}
After:
	template<> inline __host__ __device__ Ncv8u  _pixMaxVal<Ncv8u>()  {return UCHAR_MAX;}
	template<> inline __host__ __device__ Ncv16u _pixMaxVal<Ncv16u>() {return USHRT_MAX;}
1.2.4 Compile and install
$ sudo make -j4 install
This will build and install OpenCV libraries in the location: /usr/local/lib/
Note:
To customise OpenCV further, it is easiest to use the curses interactive version of CMake.
$ ccmake ..
Any settings can be changed using space key and the arrow keys. When finished, press 'c' to configure the source and 'g' to generate the Makefiles.
1.2.5 Patching libv4l
This version of OpenCV supports switching resolutions using libv4l library. But it has a limitation. It does not support cameras with resolutions higher than 5 Mega Pixel. Modifying libv4l2 library is required to add that support.
Follow the steps mentioned below to obtain the source code for libv4l2 library, modify and build it and then install it:
	$ apt-get source v4l-utils
	$ sudo apt-get build-dep v4l-utils
	$ cd v4l-utils-<version>/
Edit the file lib/libv4l2/libv4l2-priv.h as follows:
Modify the line from
"#define V4L2_FRAME_BUF_SIZE (4096 * 4096)"
To:
"#define V4L2_FRAME_BUF_SIZE (3 * 4096 * 4096)"


        $ dpkg-buildpackage -rfakeroot -uc -b
        $ cd ..
        $ sudo dpkg -i libv4l-0_<version>_<arch>.deb
Now OpenCV will support higher resolutions as well.
Initializing the camera
Make sure the e-CAM130_CUTK1 camera is connected to the J3A2 connector of the Jetson TK1 board before the board is switched on. The camera can be powered up by inserting the camera driver modules provided by e-con.
	$ modprobe -r nvhost_vi
	$ modprobe soc_camera
	$ insmod /home/ubuntu/ar1820.ko
	$ modprobe tegra_camera
Example OpenCV code
For streaming camera frames use the following C++ code:
OpenCV_Camera_Stream.cpp:
#include "opencv2/video/tracking.hpp"
#include "opencv2/imgproc/imgproc.hpp"
#include "opencv2/highgui/highgui.hpp"

#include <iostream>
#include <ctype.h>

using namespace cv;
using namespace std;

Mat image;
int main()
{
	VideoCapture cap;
	char keypressed;
	cap.open(-1);
	if( !cap.isOpened() )
	{
		cout << "***Could not initialize capturing...***\n";
		return -1;
	}
	cap.set(CV_CAP_PROP_FRAME_WIDTH,3840);
	cap.set(CV_CAP_PROP_FRAME_HEIGHT,2160);
	cout << "Width x Height = " << cap.get(CV_CAP_PROP_FRAME_WIDTH) << " x "
    << cap.get(CV_CAP_PROP_FRAME_HEIGHT) << "\n";
	namedWindow("Camera", CV_WINDOW_AUTOSIZE);
	for(;;)
	{
		cap >> image;
		if( image.empty() )
			break;
		imshow("Camera", image);
		keypressed = (char)waitKey(10);
		if( keypressed == 27 )
			break;
	}
	cap.release();
	return 0;
}
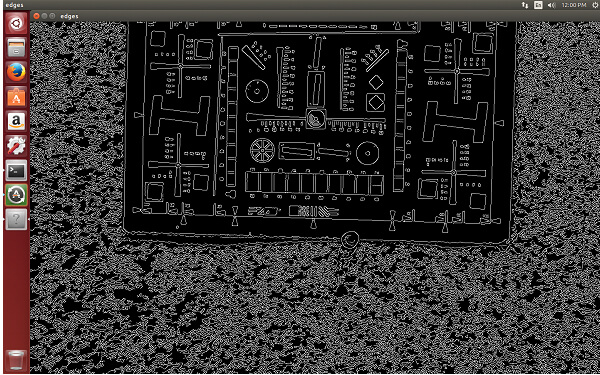
For taking camera frames and applying canny edge detection filter, use the following C++ code:
OpenCV_Canny.cpp
#include "opencv2/opencv.hpp"
using namespace cv;
Mat frame;

int main(int, char**)
{
	VideoCapture cap(-1); // open the default camera
	if(!cap.isOpened())  // check if we succeeded
		return -1;
	cap.set(CV_CAP_PROP_FRAME_WIDTH,1920);
	cap.set(CV_CAP_PROP_FRAME_HEIGHT,1080);
	Mat edges;
	namedWindow("edges",CV_WINDOW_AUTOSIZE);
	for(;;)
	{
		cap >> frame; // get a new frame from camera
		if (frame.empty())
			break;
		cvtColor(frame, edges, CV_BGR2GRAY);
		GaussianBlur(edges, edges, Size(7,7), 1.5, 1.5);
		Canny(edges, edges, 0, 30, 3);
		imshow("edges", edges);
		if((char)waitKey(10) == 27) break;
	}
	// the camera will be deinitialized automatically in VideoCapture destructor
	return 0;
}
Using OpenCV4Tegra
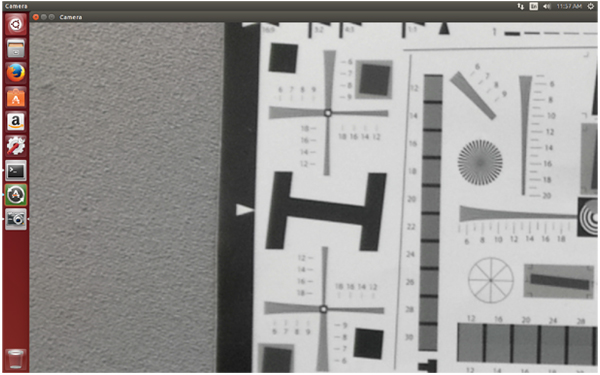
The prebuilt OpenCV4tegra library works only at VGA resolution. It doesn't support changing resolution because it uses an inbuilt v4l2 handler which is not perfect. But the processing speed is very fast due to various NEON SIMD accelerations on the CPU side as well as some GLSL optimisations in the GPU side.
Use the following command to compile the code:
        $ g++ OpenCV_Camera_Stream.cpp -I/usr/include/opencv  -L/usr/lib/
        -lopencv_calib3d -lopencv_contrib  -lopencv_core -lopencv_features2d  -lopencv_flann
        -lopencv_gpu  -lopencv_highgui  -lopencv_imgproc -lopencv_legacy  -lopencv_ml
        -lopencv_objdetect  -lopencv_photo  -lopencv_stitching  -lopencv_superres  -lopencv_ts
        -lopencv_video  -lopencv_videostab  -lopencv_esm_panorama  -lopencv_facedetect
        -lopencv_imuvstab  -lopencv_tegra  -lopencv_vstab
        -L/usr/local/cuda/lib -lcufft -lnpps -lnppi -lnppc -lcudart -lrt -lpthread -lm -ldl  -o camera_stream
The previously compiled application can be run by using the following command:
$ LD_LIBRARY_PATH=/usr/lib/ ./camera_stream
Note:
All the libraries mentioned above are not required for building these samples. But they are given in case of any modifications to the code.

Fig : OpenCV example showing camera streaming
Using custom built OpenCV
Higher resolutions from the camera will also work because of the modification to the libv4l library.
Use the following command to compile the code:
	$ g++ OpenCV_Canny.cpp -I/usr/local/include/opencv  -L/usr/local/lib/
	-lopencv_contrib  -lopencv_core -lopencv_features2d  -lopencv_flann
	-lopencv_gpu  -lopencv_highgui  -lopencv_imgproc -lopencv_legacy  -lopencv_ml
	-lopencv_nonfree -lopencv_objdetect -lopencv_ocl -lopencv_photo  -lopencv_stitching
	-lopencv_superres  -lopencv_video  -lopencv_videostab
	-L/usr/local/cuda/lib -lcufft -lnpps -lnppi -lnppc -lcudart -lrt -lpthread -lm -ldl  -o camera_canny
The previously compiled application can be run against the custom built OpenCV libraries using the environment variable LD_LIBRARY_PATH as follows:
$ LD_LIBRARY_PATH=/usr/local/lib/ ./camera_canny
Note:
All the libraries mentioned above are not required for building these samples. But they are given in case of any modifications to the code.

Fig : OpenCV example showing canny edge filter
Known Issues and Limitation
- Framerates for displaying camera frames is low at high resolutions due to conversion from yuv to bgr format.
- Not all OpenCV functionality has been tested. This document is intended only as a getting started guide.
- The version of OpenCV used for the custom build is 2.4.9
- The Linux for Tegra (L4T) version used on the Jetson TK1 is 21.2
Conclusion
Use OpenCV4tegra only if the performance is really required. Check in the documentation for OpenCV4tegra whether the functions you are using are optimized or not. The documentation can be found here. If it's not, it's better to use the custom built OpenCV as it supports other resolutions as well.
This article has to be updated with further test results of OpenCV4tegra and how much its performance differs from the custom built OpenCV with hardware accelerations enabled.