| |
Introduction
|
| |
| A very rudimentary problem we all face while trying to get hold of a new technology is the availability of content to understand the adoption and execution. Often, a specification document is considered as a quick reference guide to developers. But continuous learning comes from practice alone!
|
| |
| One such technology that is making rounds as a new-age challenge is the camera software architecture of NVIDIA's Jetson boards (Jetson TX1, TX2, Nano™& AGX Xavier™). It utilizes a framework known as 'LibArgus' for accessing cameras, which is based on C++. |
| |
| In this article we will be covering the following sections: |
- Camera Software Architecture in NVIDIA Jetson boards
- LibArgus Framework - Advantages over V4L2
- Steps to Stream a camera using LibArgus
- Key Features of LibArgus
- Raw Bayer streaming Support in LibArgus
- LibArgus-OpenCV interoperability
- Custom LibArgus Application reference
|
| |
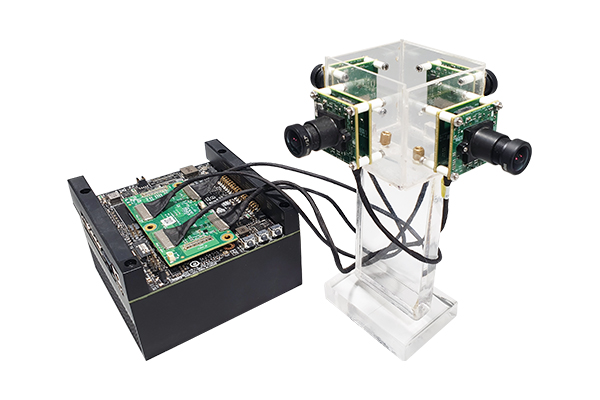
| Recently, e-con Systems® launched SurveilsQuad (e-CAM20_CUXVR), a hardware synchronized multi-camera embedded product which is supported in Jetson AGX Xavier™. SurveilsQuad is built upon and accessed using a fully customized LibArgus-based camera application, which is used to stream + capture and stream + record with or without synchronization. It can handle up to four cameras in just a single window. |
| |
| Key product features:
|
| |
- Houses 2MP Ultra Low light Sony STARVIS® IMX290 sensor with S-Mount Lens
- 4 cameras with High Speed 4-Lane MIPI CSI-2 interface variant
- Maximum transfer rate of 120fps in 10bit mode and 60fps in 12bit mode asynchronously
- Hardware frame level synchronization by interconnecting all cameras in Master-Slave configuration.
|
| |
|
| |
| SurveilsQuad - Sony IMX290 Synchronized Multi-Camera System |
| |
| We believe the cardinal rule of knowledge is sharing, and to bolster this very belief, we are sharing this article as a detailed guide into LibArgus for any camera-based software development. We assume our readers are well-equipped with Linux Systems and strong in programming languages such as C and C++. |
| |
| Now, let's jump into the world of NVIDIA® and Jetson! |
| |
Camera Software Architecture in NVIDIA Jetson Boards
|
| |
 |
| |
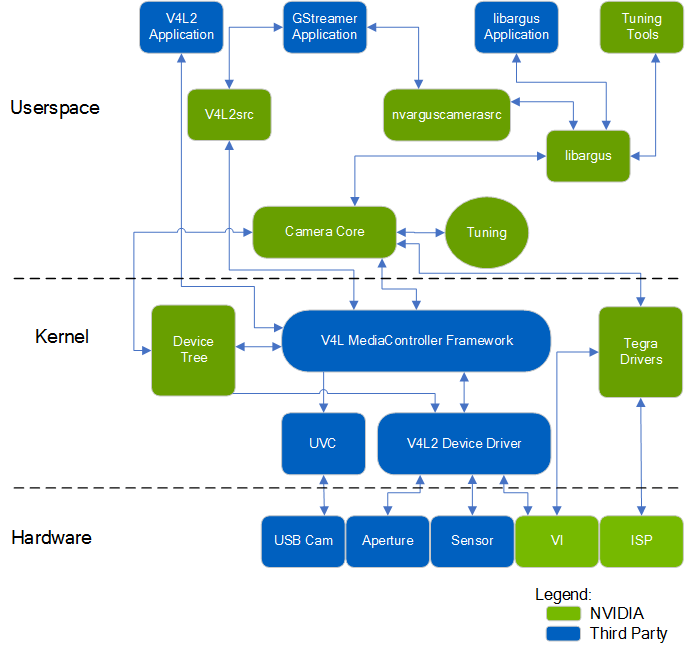
| Reference Source: //docs.nvidia.com/jetson/l4t/index.html#page/Tegra Linux Driver Package Development Guide/jetson_xavier_camera_soft_archi.html# |
| |
| The block diagram (above) is the software architecture of a camera system on Jetson. The blocks marked in blue are available to all as kernel sources and application samples. They can be downloaded separately or through the latest Jetpack/SDK Manager released by NVIDIA®. To download the sources, please check the Jetson Download Center. |
| |
| How the camera is accessed |
| |
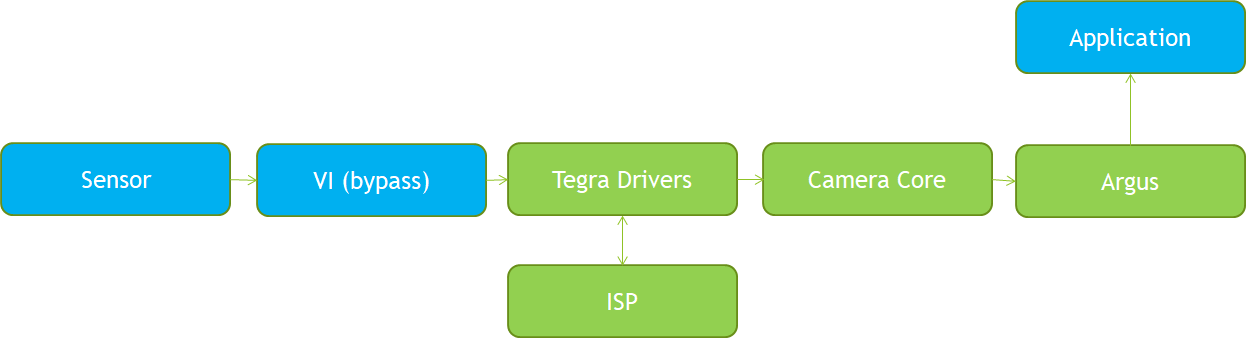
| A V4L2 device driver acts as an entry point for the camera device. The data from the sensor is given to the VI where these frames are bypassed and provided to the Tegra Driver. The Tegra Driver later makes use of the ISP and the camera core to process the incoming buffer. The processed buffer is then sent to the LibArgus library from which it can be accessed in the user space via LibArgus APIs.
|
| |
 |
| |
LibArgus Framework
|
| |
| The user can access a camera device in Jetson either with the help of V4L2 (Video 4 Linux) user space API's and ioctl calls or using the LibArgus framework. A major difference between the two is that LibArgus only supports platform cameras that are connected via MIPI interface whereas any other camera - connected through USB, MIPI, ethernet, etc. - can make use of the V4L2 framework.
|
| |
| The NVIDIA® Jetson boards contain many dedicated hardware blocks internally for various operations such as Image Quality Processing (ISP), Video Encoding (Encoder), Image Scaling and Resizing, and others.
|
| |
|
Advantages of using the LibArgus pipeline over V4L2:
- Image post processing such as denoising and edge enhancement
- Support for multi-streaming a single camera and setting controls specific to a particular stream
- Optional AutoControl Settings such as Auto White Balance and Auto Exposure
- Frame Metadata delivery via LibArgus events and EglStream Metadata
- Support for multiple sensors in MIPI
- Image statistics such as Tone curve regions, RGB channel gains, AE regions, etc.
- Efficient and simple integration into larger frameworks (images are wrapped with EGLStreams; directly supported by components like OpenGL, VisionWorks, CUDA, DeepStream and OpenCV with no buffer copies)
|
| |
| Note: |
| |
| NVIDIA® currently only supports Bayer cameras which can be accessed via LibArgus. Since these camera drivers are V4L2 compliant, when a user tries to stream the camera via v4l2, the frames acquired will be Raw Bayer and not ISP-processed. For accessing a camera, one can use the gstreamer plugin 'nvarguscamerasrc' containing a prebuilt set of parameters which are exposed for controlling the camera. An alternative is to make use of the tegra_multimedia_api package which contains samples, and a sample GTK application 'argus_camera' based on LibArgus framework.
|
| |
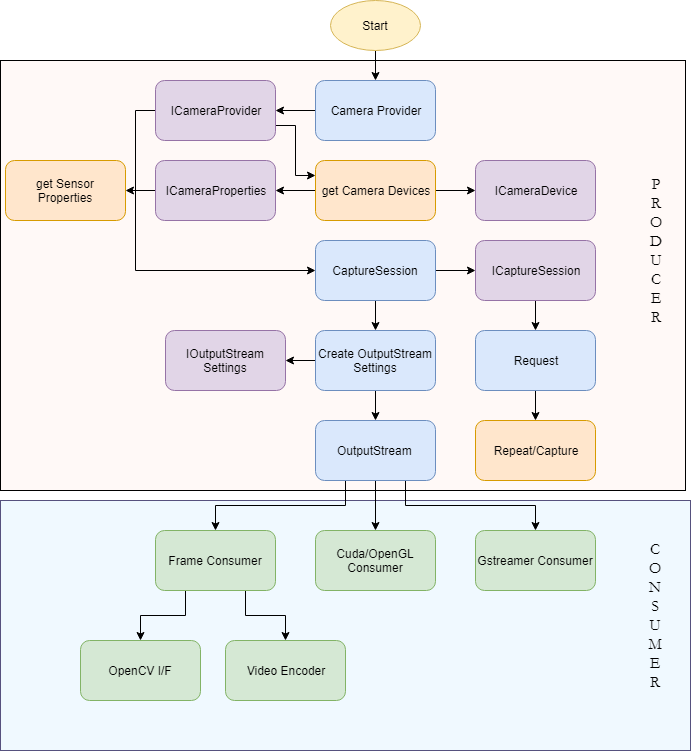
| The application pipeline is built on the foundation of creating class objects and configuring the objects using interfaces. The LibArgus framework is broadly separated into two sections:
|
| |
|
Advantages of using the LibArgus pipeline over V4L2:
- Producer - generates output streams for streaming the cameras with the afore mentioned configuration.
- Consumer - processes the frames from the Argus producer (varies as per user application)
|
| |
Steps to Stream a Camera using LibArgus
|
| |
| To get a hold on to the code we will first try to create a pipleine inorder to capture a single frame from the camera. Inorder to do this, kindly follow the steps as mentioned below: |
| |
 |
| |
- Creation of 'CameraProvider' object and 'ICameraProvider' interface for the corresponding object. Every application will have only one 'CameraProvider' object instance.
-
- Using the ICameraProvider interface query the number of devices available using the 'getCameraDevices()' API. Based on the number of devices connected, the camera device pointers will be returned by the 'getCameraDevices()' API.
-
- Create a 'ICameraProperties' interface for the CameraDevice pointer attained from the previous step and get all the available sensor modes supported by the camera using the 'getAllSensorModes()' API.
-
- Get individual sensor properties using the 'ISensorMode' interface created from the SensorMode pointer from the previous step.
-
- Create a CaptureSession using the ICameraProvider interface 'createCaptureSession()' API which takes the Camera Device pointer as an argument.
-
- Create an OutputStream Settings object for configuring the image format, stream size, etc. using the ICaptureSession 'reateOutputStreamSettings()'
-
- Using IOutputStreamSettings interface for the OutputStream settings object set the type of stream, frame size, mode of transfer, etc.
-
- Using the configured OutputStreamSettings object create an OutputStream using the ICaptureSession createOutputStream() API.
-
- Create a Request object to handle controls and capture requests and enable the output stream using the IRequest interface.
-
- Create a Consumer based on the OutputStream and Request created in the previous step. Consumers may vary based on the end application use case.
-
- For reference, we will capture a frame, encode in JPEG and write the frame to a file. For capturing frames from an OutputStream, we must first continuously capture frames from the CaptureSession.
-
- Now that we have captured a frame, we may have to acquire the frame from the OutputStream. So, we use the FrameConsumer object and IFrameConsumer interface that were previously created.
-
- From the acquired frame, we create an Iframe interface and get the Image buffer. The Image pointer in the Frame Object supports many extensions interfaces such as IImageJPEG, IImage2D, IImageNativeBuffer, etc. Then, we create IImageJPEG interface for the image pointer and capture images using the writeJPEG() API.
-
- For reference, you can use the oneShot argus sample present in the tegra_multimedia_api/argus/samples directory for understanding the code flow. The above code snippets are available in the oneShot example.
-
- Additionally, for handling camera controls (both sensor and ISP), make use of the ‘Request’ object. From the IRequest interface, the getSourceSettings() and getAutoControlSettings() API returns ISourceSettings and IAutoControlSettings interfaces which are used to control the sensor and ISP controls respectively.
|
| |
Key Features
|
| |
| The camera device can only have one CaptureSession, but multiple OutputStreams can be created. It is tremendously useful for applications such as video recording+streaming, streaming+network transfer, object detection+recording, and much more.
|
| |
- Set the regions of interest for calculating the AutoExposure by using the IAutoControlSettings interface before creating/enabling an OutputStream.
- Create OpenCV Mat with the help of tegra_multimedia_api samples that use NvBuffer transform to convert input color format I420 to ARGB32.
- Obtain frame statistics such as the Bayer Histogram, RGB Histogram, current gain, exposure, frame rate, scene luminance etc. through the IArgusCaptureMetadata interface. You can:
- Create a CAPTURE_COMPLETE event and queue it - using the IEventProvider interface Whenever a frame is available at the consumer a CAPTURE_COMPLETE event is triggered and from the triggered event metata can be acquired
- Use the IArgusCaptureMetadata interface on the acquired Frame if one uses FrameConsumer object
- Use the MetadataContainer interface to obtain metadata from the acquired frame via CudaConsumer thread
|
| |
| Please refer the L4T Multimedia API specification present in the Jetson Download Center for more detailed documentation. |
| |
Raw Bayer support in LibArgus
|
| |
| The pixel formats that are available in LibArgus can be known from the header file Types.h present inside tegra_multimedia_api/argus/include/Argus/ directory and the formats listed are: |
| |
- PIXEL_FMT_Y8
- PIXEL_FMT_Y16
- PIXEL_FMT_YCbCr_420_888
- PIXEL_FMT_YCbCr_422_888
- PIXEL_FMT_YCbCr_444_888
- PIXEL_FMT_JPEG_BLOB
- PIXEL_FMT_RAW16
- PIXEL_FMT_P016
|
| |
| LibArgus currently supports and recommends using PIXEL_FMT_YCbCr_420_888 or PIXEL_FMT_P016 while setting the pixelformat in OutputStreamSettings object. |
| |
| Optionally, the pixel format PIXEL_FMT_RAW16 can be used to get RAW frames directly from the sensor by bypassing the Demosaicing Engine. But this format does not support many LibArgus Consumer and NvBuffer APIs. |
| |
| However, we have found two ways of accessing and processing Bayer stream buffers in AGX Xavier™. A user can make use of the IImageHeaderlessFile interface to save the raw acquired Frame or use the CUDA Consumer and implement an own CUDA kernel for processing the RAW input from sensor. |
| |
When using IImageHeaderlessFile, consider the same example as mentioned above to write JPEG encoded image. The user needs to replace the setPixelFormat() method Argument to PIXEL_FMT_RAW16. Next, replace the IImageJPEG interface to IImageHeaderlessFile and call the writeHeaderlessFile() method. The code snippet for which is:
-
-
- For processing Bayer data or RAW frames from the sensor via CUDA Consumer, please check the cudaBayerHistogram sample present in argus/samples/ directory of tegra_multimedia_api.
|
| |
Integrating OpenCV with LibArgus
|
| |
| The robust LibArgus framework can be easily integrated into many advanced vision/media frameworks such as OpenCV, OpenVX, OpenGL, DeepStream, and Gstreamer. The OutputStream consumer play a vital role to achieve this interconnection in frames. However, you must take care while choosing the OutputStream consumer as to what type of operation you seek to integrate. A simple example would be to integrate OpenCV in LibArgus. |
| |
| OpenCV frames utilize RGB Mat objects whereas LibArgus makes use of the YUV420 or NV12 EGLStream Image object. To map the LibArgus frame to OpenCV, we first create an IImageNativeBuffer interface over the Image pointer and create a concurrent NvBuffer for the frame. The IImageNativeBuffer interface's createNvBuffer() method contains an argument which defines the color format for our created NvBuffer. |
| |
| List of supported NvBuffer formats |
| |
- NvBufferColorFormat_YUV420
- NvBufferColorFormat_YUV420_ER
- NvBufferColorFormat_NV12
- NvBufferColorFormat_NV12_ER
- NvBufferColorFormat_NV21
- NvBufferColorFormat_NV21_ER
- NvBufferColorFormat_UYVY
- NvBufferColorFormat_ABGR32
- NvBufferColorFormat_XRGB32
- NvBufferColorFormat_ARGB32, etc.
|
| |
Consider the same oneShot sample (discussed in previous sections). The below steps need to be followed to integrate OpenCV-Argus interoperability
- Include the header files and namespace necessary in your source file.
- Instead of creating a IImageJPEG interface and calling writeJPEG() API, replace the following code snippet.
|
| |
-
-
IFrame *iFrame = interface_cast< IFrame>(frame);
if(!iFrame)
ORIGINATE_ERROR("Failed to get IFrame interface");
Image *image = iFrame->getImage();
if(!image)
ORIGINATE_ERROR("Failed to get Image from iFrame->getImage()");
NV::IImageNativeBuffer *iNativeBuffer =
interface_cast<NV::IImageNativeBuffer>(image);
if (!iNativeBuffer)
ORIGINATE_ERROR("IImageNativeBuffer not supported by Image.");
int fd = iNativeBuffer->createNvBuffer(iSensorMode->getResolution(),
NvBufferColorFormat_ABGR32, NvBufferLayout_Pitch);
void *pdata = NULL;
NvBufferMemMap(fd, 0, NvBufferMem_Read, &pdata);
NvBufferMemSyncForCpu(fd, 0, &pdata);
cv::Mat imgbuf = cv::Mat(iSensorMode->getResolution().height(),
iSensorMode->getResolution().width(),CV_8UC4, pdata);
cv::Mat display_img;
cvtColor(imgbuf, display_img, CV_RGBA2BGR);
NvBufferMemUnMap(fd, 0, &pdata);
cv::imshow("img", display_img);
cv::waitKey(1);
-
- Include the OpenCV library in the CMakeList.txt file present for your source file.
-
- Package: find_package(OpenCV REQUIRED)
- Include Directories Variable: ${OPENCV_INCLUDE_DIR}
- Libraries Variable: ${OpenCV_LIBS}
|
| |
Customized LibArgus Application
|
| |
| With LibArgus, your camera application's scope is unlimited. At e-con Systems®, we have recently developed and released a fully customized LibArgus Application 'eCAM_Argus_MultiCamera'. It is a command line application generalized to run with any type of camera board connected to any of the NVIDIA® Jetson boards (provided it is ISP compliant with the specific L4T release).
|
| |
| Key features of eCAM_Argus_MultiCamera: |
- Dynamically stream from multiple cameras (1-6) on a single application instance
- Synchronously/asynchronously capture images from all actively streaming cameras
- Burst record from all actively streaming cameras
- Support for obtaining and displaying frame statistics such as ISO Sensitivity, Scene Luminance, Exposure time, Sensor Timestamp, etc.
- Modularized application source for easy integration with other frameworks such as OpenCV, VisionWorks, Gstreamer, etc.
- Support for individual camera and ISP control configuration
|
| |
| We hope this blog helped in furthering your ability to maximize the potential of NVIDIA's Jetson boards. On the purchase of SurveilsQuad Cameras, you will gain complete access to the source code of 'eCAM_Argus_MultiCamera' application, along with the User Manual. |
| |
| For more details, please visit www.e-consystems.com or contact us at sales@e-consystems.com. |
| |
 |
| |


 Mr. Thomas Yoon
 +82-10-5380-0313