| |
Introduction
|
| |
| This article gives a comprehensive method to build OpenCV 3.3.1 with many features and optimizations enabled. A sample application source code which allows the users to access V4L2 camera devices and use OpenCV operations with high performance is also given.
|
| |
OpenCV Version
|
| |
| After testing multiple versions of OpenCV starting from 2.4.9 up to 3.4.2 for the Jetson TX1/TX2 it was found that any version of OpenCV above 3.2.0 runs much faster on the Jetson platform. This is because ARM optimizations for OpenCV done by Nvidia have been integrated into the 3.2.0 branch and higher versions. This was earlier available for download only as a prebuilt binary called as opencv4tegra. The list of APIs that are optimized are documented here. |
| |
OpenCV Build
|
| |
| The OpenCV version 3.3.1 can be easily installed on a Jetson TX1/TX2 using Jetpack from Nvidia because it provides ready to install pre-built libraries. Hence no compilation of code is required. However, this doesn’t give the most optimized or feature-rich build of OpenCV for the Jetson TX1/TX2. Many options such as GStreamer support, CUDA, and OpenGL support are disabled by default. |
| |
| Check out the OpenCV install script provided in the opencv_v4l2 git repository. |
| |
| It has multiple features and performance optimizations enabled for the Jetson TX1/TX2. Some of the most important ones are: support for CUDA, OpenGL, GStreamer, and Python3 bindings. Building OpenCV using this script is guaranteed to give better results than any other prebuilt version of OpenCV one can install from the Ubuntu repositories or using Jetpack. Before running this script, it is however required to install CUDA on the Jetson using the latest Jetpack provided by Nvidia. Please refer to Nvidia's official documentation for Jetpack to know how to do this. |
| |
Direct access to the V4L2 buffer
|
| |
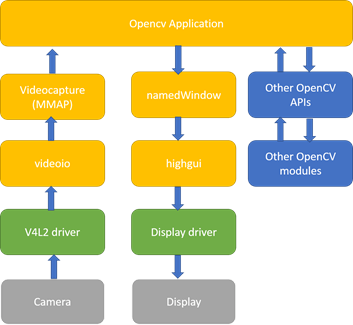
| Latest versions of OpenCV has support for V4L2 devices using the videoio module (earlier highgui). The VideoCapture class in this module accesses cameras using V4L2 MMAP method to access the camera data. It then makes a local copy of the image data using memcpy to provide it in the OpenCV Mat format. This is not the most efficient way of accessing the camera data because it was observed that, at higher resolutions, the frame rates drop significantly when trying to display the data. Let alone do heavy processing. |
| |
|
| |
| Figure 1: Conventional OpenCV method |
| |
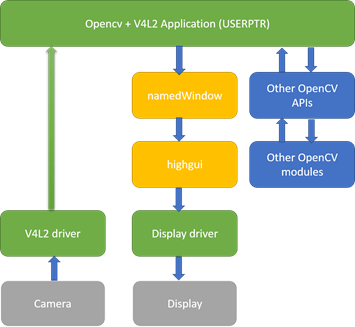
| Of course, patching OpenCV to fix this is one way, but when a user wishes to try a new version of OpenCV, migrating the patches to the newer version of OpenCV would be needed. This would be too cumbersome to users and hence modifying existing OpenCV code was not chosen as a viable option. Alternately, the use of V4L2 APIs for accessing camera data rather than OpenCV APIs was chosen as the best way to go. This way, the memcpy in OpenCV can be avoided. Also, any version of OpenCV (higher than 3.2.0) can be used to achieve higher frame rates. A simple v4l2_helper library and APIs in the source code is provided to help users who are not familiar with V4L2. Users can easily port this library depending upon their use cases. Grabbing image data is as simple as calling 2 APIs using this library. |
| |
| But the data still needs to be presented as a Mat data type for OpenCV operations to be performed. The Mat is just a simple container for actual image data. The 4 values rows, cols, type, and data are all that is required to represent an image buffer of any format as an OpenCV Mat. This feature was leveraged to make the camera image data accessible to OpenCV.
|
| |
 |
| |
| Figure 2: Direct access to V4L2 memory |
| |
| The image data from any camera can be mapped to an OpenCV Mat. However, most processing in OpenCV is done on Mats which contain BGR image data. Hence it is required to convert the image from the camera to the required colorspace. For this purpose, cvtColor can be used. This function will be implicitly called when VideoCapture is used to grab data from the camera. Because V4L2 is used to access the camera device directly, the cvtColor API needs to be called explicitly in the modified code. Ever since OpenCV version 3.2.0, this API is optimized for the ARM architecture and hence there will be no significant bottleneck here. But if an older version of OpenCV such as 2.4.9 is used, then the frame rates will suffer.
|
| |
OpenGL for rendering
|
| |
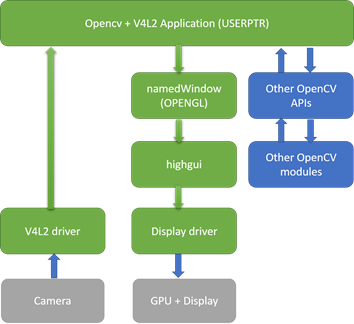
| The data in the OpenCV Mat can be displayed using another OpenCV API, i.e imshow. It is not mandatory to use namedWindow to create a window for OpenCV to use first, because imshow implicitly creates a window by itself. However, it was also observed that, when the image data in the Mat is rendered without explicitly calling namedWindow with CV_WINDOW_OPENGL flag selected, the frame rate of the displayed data is lower. Also, when this flag is enabled the maximum frame rate of the imshow window is locked to the refresh rate of the display. Hence, if the display is configured at a refresh rate of 30Hz, the maximum frame rate that the imshow window can display will be 30 fps even if the camera supports 72 fps. It is recommended to use xrandr tool to verify and change the display refresh rate as required. |
| |
 |
| |
| Figure 3: OpenGL optimized display |
| |
| Depending on the use case of the final application, sometimes rendering of the image data might not even be required. In such cases, the namedWindow and imshow calls are not used at all. The display rendering takes up considerable system resources (unless the image is resized before display). Hence, the frame rates achieved will be higher than for the same use case with rendering enabled. |
| |
| A code snippet for reference:
|
| |
|
/*
* Helper function to initialize camera to a specific resolution and format
*/
if (helper_init_cam(videodev, width, height, V4L2_PIX_FMT_UYVY, IO_METHOD_USERPTR) < 0) {
return EXIT_FAILURE;
}
/*
* CV_WINDOW_OPENGL is important here.
*/
namedWindow("OpenCV V4L2", CV_WINDOW_OPENGL);
cuda::GpuMat gpu_frame;
/*
* As we re-use the matrix across loops for increased performance in case of higher resolutions
* we construct it with the common parameters: rows (height), columns (width), type of data in
* matrix.
*/
yuyv_frame = Mat(height, width, CV_8UC2);
while(1)
{
/*
* Helper function to access camera data
*/
if (helper_get_cam_frame(&ptr_cam_frame, &bytes_used) < 0) {
break;
}
/*
* It's easy to re-use the matrix for our case (V4L2 user pointer) by changing the
* member 'data' to point to the data obtained from the V4L2 helper.
*/
yuyv_frame.data = ptr_cam_frame;
/*
* Convert to BGR because OpenCV needs this.
*/
cvtColor(yuyv_frame, preview, COLOR_YUV2BGR_UYVY);
/*
* Uploading the frame matrix to a cv::cuda::GpuMat and using it to display (via cv::imshow) also
* contributes to better and consistent performance.
*/
gpu_frame.upload(preview);
imshow("OpenCV V4L2", gpu_frame);
/*
* Helper function to release camera data. This must be called for every call to
* helper_get_cam_frame()
*/
if (helper_release_cam_frame() < 0)
{
break;
}
if(waitKey(1) == 27) break;
}
/*
* Helper function to free allocated resources and close the camera device.
*/
if (helper_deinit_cam() < 0)
{
return EXIT_FAILURE;
}
|
|
|
| |
| In the above code snippet, the v4l2_helper APIs are used to get camera image data and encapsulate it in OpenCV Mat. Then this Mat is uploaded to a GpuMat and displayed using imshow on a window created with OpenGL rendering enabled. This helps to render the highest framerates supported by the camera. |
| |
Source Code
|
| |
|
The entire source code of the sample applications along with the source code of the V4L2 helper library can be downloaded from the following git repository: https://github.com/econsystems/opencv_v4l2
|
| |
|
It contains detailed instructions on how to build and install the OpenCV library and sample applications in the README.md
file.
|
| |
Test Results
|
| |
|
The below table summarizes the differences observed with different options of OpenCV:
|
| |
| Resolution |
Fps in OpenCV 3.3.1 installed from Jetpack 3.2.1 with VideoCapture and no OpenGL rendering |
Fps in OpenCV 3.3.1 built from source with V4L2 and OpenGL + CUDA rendering |
Fps in OpenCV 3.3.1 built from source with V4L2 and no imshow |
Maximum fps supported by the camera |
| 640x480 |
60 |
60 |
60 |
60 |
| 1280x720 |
62-68* |
72 |
72 |
72 |
| 1920x1080 |
28-36* |
72 |
72 |
72 |
| 3840x2160 |
4-10* |
25 |
30 |
30 |
| 4224x3156 |
5-6* |
19 |
20 |
20 |
|
| |
| Table 1: Test results with various builds of OpenCV |
| |
| * - Inconsistent and preview is not smooth. Sometimes the system becomes too slow. |
| |
| As per the data available in the above table, the optimized build of OpenCV provides better results than the default provided OpenCV build in Jetpack. In cases where displaying is not used, it is even possible to achieve the full frame rate supported by the camera! A more detailed version of our test results is available in the git repository. |
| |
|
In a nutshell, the following things need to be taken care of:
- The latest version of OpenCV should be used if possible. The minimum requirement for good performance is OpenCV 3.2.0
- OpenCV installed via Jetpack or from ubuntu repositories is not optimized for performance. Hence, OpenCV must be built from source with a minimum of CUDA and OpenGL enabled.
- A rendering window must be initialized using namedWindow with the flag CV_WINDOW_OPENGL set. So that imshow performance is speeded up and higher camera frame rates can be supported.
- The most important one, the VideoCapture class of OpenCV must be avoided for accessing camera devices. Instead, the helper functions provided in the git repository can be used to access the camera image data directly via V4L2.
- When the camera preview does not need to be displayed, it is possible to get even higher framerates by not using imshow. For example: 4K@30 fps.
|
| |
Conclusion
|
| |
| This article explains how to build OpenCV 3.3.1 with multiple performance optimizations enabled. It also provides a brief about how to access camera image data in OpenCV with high performance. |
| |
Disclaimer
|
| |
| The information provided in this article is tested and correct to the best of our knowledge. The OpenCV version used for testing the performance is 3.3.1. The Jetpack version from Nvidia used is 3.2.1. The camera we used for testing the frame rates is e-CAM130_CUTX1. The version of CUDA used is 9.0. It is recommended to use the jetson_clocks.sh script provided by Nvidia on the Jetson board to get the most stable performance. We set the camera to manual exposure mode with a frame time of 13.8ms to achieve highest frame rates supported by the camera. The display resolution used was 1440x900@75Hz. A host system running Ubuntu 16.04 (64bit) was used to install CUDA 9.0. The sample applications as well as the test results were observed only for grabbing, colorspace conversion and for display. If additional processing of the image data is done, this might affect the performance of the sample applications. |
| |
 |
| |


 Mr. Thomas Yoon
 +82-10-5380-0313