

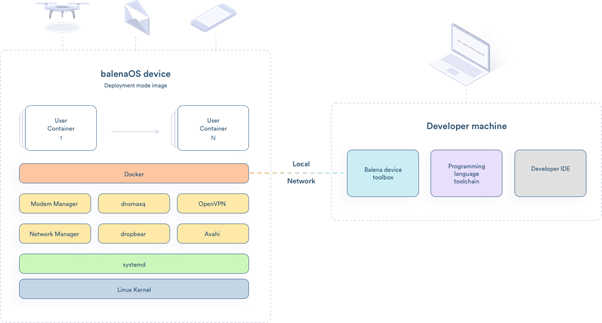
What is balenaOS
balenaOS is an operating system optimized for running docker containers on embedded devices, which provides reliability over long periods of operation and productive developer workflow. balenaOS helps to run docker containers with Linux on embedded devices. This operating system is built for easy portability to multiple device types (via the Yocto framework and optimized for Linux containers, and docker in particular).
It provides a complete set of tools for building, deploying, and managing fleets of connected Linux devices, and also provides infrastructure for fleet owners so they can focus on developing their applications and growing their fleets with as little friction as possible.
Below is a representation of an ecosystem enabled with balenaOS:
This open-source OS supports BSP for various platforms such as NVIDIA’s Jetson processors and its partner carrier boards, NXP’s IMX8 and its partner carrier boards, and the Intel NUC platform.
Due to these advanced features, balenaOS is very suitable for connected devices such as drones, delivery robots, autonomous mobile robots, Surround view systems, fleet management etc.
This blog is about how to integrate one of e-con’s cameras NileCAM25_CUXVR, which is a GMSL2 global shutter color camera for NVIDIA Jetson AGX Xavier with balenaOS.
Integrating NileCAM25_CUXVR with balenaOS
NileCAM25_CUXVR – Key Features
NileCAM25_CUXVR comes with below feature which makes this camera suitable for autonomous mobile robots, surround view systems, fleet management, etc.
- Full HD Global Shutter Color Camera
- GMSL2 interface with 15-meter cable support
- Frame rate of 120 fps
- External Trigger support for sensor fusion (with external sensors such as IMU, LiDAR, GPS, etc)
Prerequisites for integrating the camera with balenaOS
- Follow the instructions provided in the sections Account setup and Create a fleet in the following link, https://www.balena.io/docs/learn/getting-started/jetson-xavier/nodejs/#example-projects?ref=dockerhub to setup a balena account and to create an application for jetson xavier device respectively.
- Follow the instructions provided in the section Install the balena CLI (Linux Tab) in the following link, https://www.balena.io/docs/learn/getting-started/jetson-xavier/nodejs/#example-projects?ref=dockerhub to install the balean CLI application. This is used login, authenticate and push codes( via docker) to the created fleet. Make sure that you are exporting path of balena-cli binary permanently in your host system.
- Install the following dependencies in the host system.
- $ sudo apt-get install libssl1.0-dev nodejs-dev node-gyp npm jq chrpath gawk
- Install the docker and assign the permission to the current user.
- $ sudo snap install docker
$ sudo apt-get install docker.io
$ sudo usermod -aG docker
$USER $ newgrp docker
- $ sudo snap install docker
- Install the latest Go for linux using the instructions provided in the following link,
https://golang.org/doc/install - Reboot the host system after installing all the dependencies to properly initiate the docker.
Balena Yocto Local Build Procedure
Follow the instructions provided in this section to build custom balena OS image with e-con’s NileCAM25_CUXVR camera support.
- Clone the balena-jetson yocto source.
- git clone https://github.com/balena-os/balena-jetson.git
- Download the needed dependencies (i.e) other yocto repositories needed for yocto build using following command.
- cd balena-jetson
git submodule update –init –recursive
- cd balena-jetson
- Checkout to the tag for the L4T32.4.4 and create a temporary development branch.
- git checkout v2.80.5+rev4
git checkout -b <BRANCH NAME>
- git checkout v2.80.5+rev4
- Add the NileCAM25 support to the yocto bsp using the patch file
balena_os_v2.80.5+rev4_nilecam25_jetson_xavier_yocto.patch ( Contact e-con to get the driver patch)- patch -p1 -i
<PATH_TO_PATCH>/balena_os_v2.80.5+rev4_nilecam25_jetson_xavier_yocto.patch
- patch -p1 -i
- Checkout to the tag v2.80.5 in the meta-balena source.
- cd layers/meta-balena
git checkout v2.80.5
- cd layers/meta-balena
- Checkout to the commit id 07f15cec44977dfba279062b36241e31b130ebfa in the meta-tegra source.
- cd ../meta-tegra/
git checkout 07f15cec44977dfba279062b36241e31b130ebf
- cd ../meta-tegra/
- Move back to the balena-jetson directory.
- cd ../../
- Build the Jetson xavier balenaOS image with NileCAM25 support as follows,
- balena-yocto-scripts/build/barys -b <Build Directory Name> –shared-downloads <Download Directory> -m <MACHINE NAME>
Example:
balena-yocto-scripts/build/barys -b nilecam25_xavier_balena_os –shared-downloads $HOME/downloads -m nilecam25-jetson-xavier
- balena-yocto-scripts/build/barys -b <Build Directory Name> –shared-downloads <Download Directory> -m <MACHINE NAME>
- This will take few hours to complete. On the successful completion of the build, the Balena OS image can be found in the location, “<PATH TO BALENA JETSON BUILD DIR>/tmp/deploy/images/nilecam25-jetson-xavier/balena-image-nilecam25-jetson-xavier.balenaos-img“
Configuring Built Image
- Configure the built balena-image-nilecam25-jetson-xavier.balenaos-img in the created fleet name.
- balena os configure <Balena OS Image Name with Complete Path> -a <your_jetson_agx_xavier_dashboard_application_name> –version <BalenaOS_version>
- Custom machine name configuration is not supported by balena. Hence rename all occurrences of nilecam25-jetson-xavier to jetson-xavier in the files config.json and device-type.json which are located in the resin-boot partition of balena-image-nilecam25-jetson-xavier.balenaos-img using the following procedure.
- Mount the balenaOS image to a loopback device.
- $ sudo losetup -fP <Balena OS Image Name with Complete Path>
- Find the mounted loop device using following command,
- $ dmesg | tail
Sample log:
[33390.017136]
loop31: p1 p2 p3 p4 p5 p6 p7 p8 p9 p10 p11 p12 p13 p14 p15 p16 p17 p18 p19 p20 p21 p22 p23 p24 p25 p26 p27 p28 p29 p30 p31 p32 p33 p34 p35 p36 p37 p38 p39 p40 p41
Here the image is mount at /dev/loop31
- $ dmesg | tail
- Find the partiton number of “resin-boot” partition using following command.
- $ ls -l /dev/disk/by-partlabel/resin-boot
Sample log:
lrwxrwxrwx 1 root root 15 Jul 16 20:10 /dev/disk/by-partlabel/resin-boot -> ../../loop31p37
- $ ls -l /dev/disk/by-partlabel/resin-boot
- Mount the resin-boot partition to a known mount point.
- $ mkdir ~/my_image
$ sudo mount /dev/loop31p37 ~/my_image
- $ mkdir ~/my_image
- check the files present in the resin-boot partition.
- $ ls ~/my_image/
Sample log:
balena-image balenaos.fingerprint bootfiles config.json device-type.json image-version-info os-release splash system-connections
- $ ls ~/my_image/
- Open “config.json” and “device-type.json” files and rename all occurrences of “nilecam25-jetson-xavier” to “jetson-xavier” and then save the files.
- Unmount the “resin-boot” partition.
- $ sudo umount ~/my_image
- Detach the mounted loop device.
- $ sudo losetup -D /dev/loop31
- Mount the balenaOS image to a loopback device.
Flashing Balena OS Image in Jetson AGX Xavier Development Kit
- Clone Balena Jetson Flash source setup files.
- git clone https://github.com/balena-os/jetson-flash.git
cd jetson-flash
- git clone https://github.com/balena-os/jetson-flash.git
- For flashing you will need to use NodeJs v10 or v12. The list of dependencies can be installed using the following commands in the host system. This is a onetime process.
- $ npm i bluebird
$ npm i ext2fs
$ npm i file-disk
$ npm i fs-extra
$ npm i hasha
$ npm i install
$ npm i lodash
$ npm i make-dir
$ npm i partitioninfo
$ npm i progress-stream
$ npm i request
$ npm i resin-cli-visuals
$ npm i resin-image-fs
$ npm i stream-to-string
$ npm i string-to-stream
$ npm i tar-fs
$ npm i unbzip2-stream
$ npm i xml-js
$ sudo npm install -g n
$ sudo n latest
$ sudo npm install -g npm
$ npm i yargs
$ npm audit fix
$ npm rebuild
$ npm install
- $ npm i bluebird
- Put the Jetson Xavier kit in recovery mode and use the following command to flash the image.
- ./bin/cmd.js -f <Balena OS Image Name with Complete Path>
Where,
FLASH DEVICE TYPE – jetson-xavier
- ./bin/cmd.js -f <Balena OS Image Name with Complete Path>
- This will take a few minutes to complete. The board will automatically reboot after the completion of flashing.
Checking Camera Streaming
- After flashing is completed, make sure that, your AGX Jetson Xavier kit is connected to the stable internet.
- Connect the NileCAM25_CUXVR camera module to the AGX Jetson Xavier Kit and then power on the Kit.
- Please make sure that you have exported balena-cli binary path in your terminal.
- Login to your Balena account with balena login command in your host system.
- $ balena login
Logging in to balena-cloud.com
? How would you like to login? (Use arrow keys)
❯ Web authorization (recommended)
Credentials
Authentication token
I don’t have a balena account!
- $ balena login
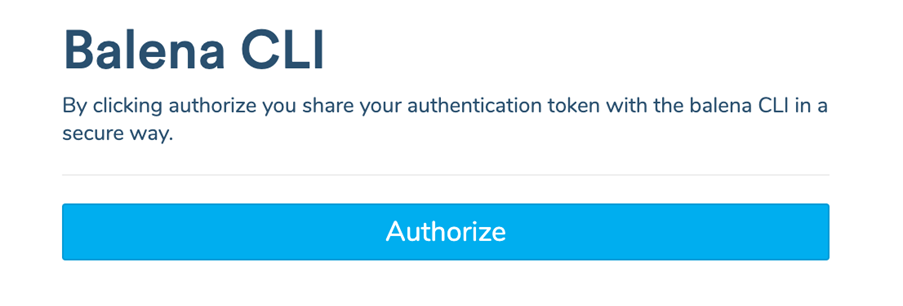
- You will be asked to choose an authentication method. Choosing Web authorization will bring up a web browser window that allows you to login to your balenaCloud account. When asked to authorize the CLI, click the Authorize button and head back to the terminal.
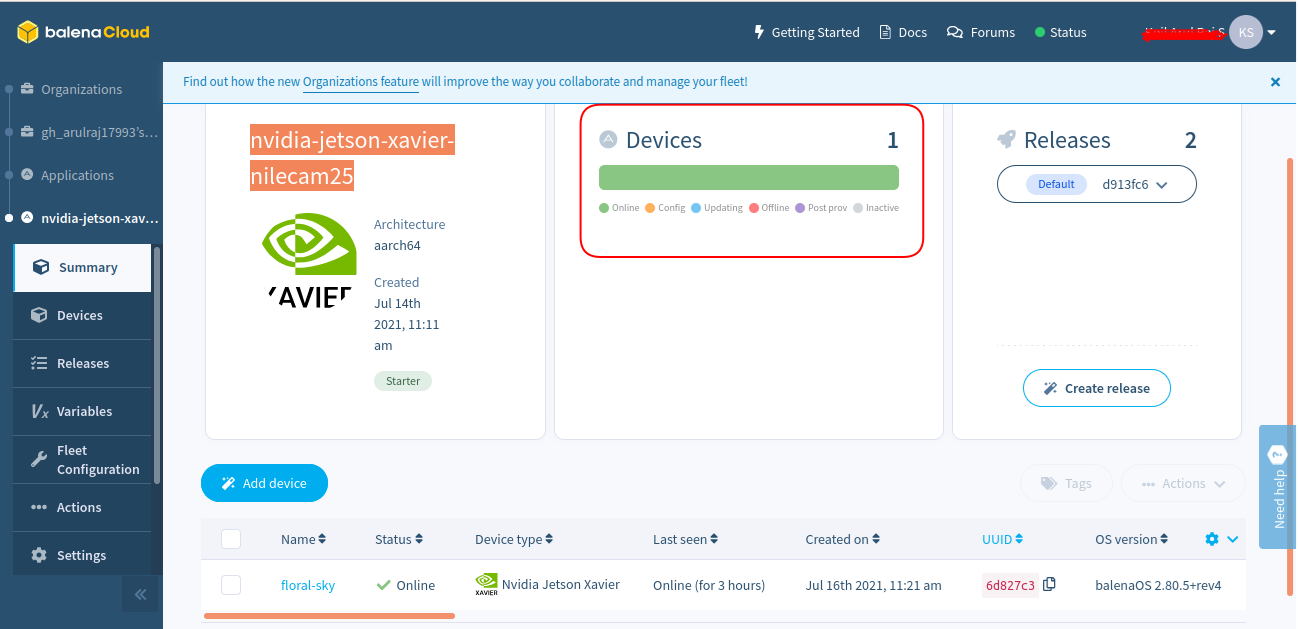
- Check whether Jetson xavier kit is listed in the dash board. If the image configuration and flashing is successful, your balena account will list the Jetson Kit as shown in the image below,

- Download the attached docker file Dockerfile.template. This docker file application installs L4T(32.4.4) BSP archive along xfce and gstreamer in the container, and starts a Desktop session at runtime in the Jetson AGX Xavier kit.
- Create a directory and copy the docker file to the directory.
- $ mkdir ~/test
$ cp ~/Downloads/Dockerfile.template ~/test
$ cd ~/test
- $ mkdir ~/test
- Enter “balena fleets” command to get the created fleet name.
- $ balena fleets
Sample log:
ID FLEET NAME DEVICE TYPE ONLINE DEVICES DEVICE COUNT
98264 nvidia-jetson-xavier-nilecam25 Nvidia Jetson Xavier 1 1
- $ balena fleets
- Finally, deploy the docker application to all device(s) in the application using balena push command.
- $ balena push
Example,
$ balena push nvidia-jetson-xavier-nilecam25
Note:
Make sure that, you are in the directory where the Dockerfile is present.
- $ balena push
- This will take 15-20 minutes to build and upload. Wait until this application gets listed in the “Releases” tab of balena dashboard.
- After the successful completion of build and upload, the Jetson Xavier kit will run xserver with minimum graphics GUI. Connect keyboard and mouse to the kit.
- Open a terminal and execute the following Gstreamer command to view the camera stream.
- $ gst-launch-1.0 v4l2src device=/dev/video ! “video/x-raw, format=(string)UYVY, width=(int)1920,height=(int)1080” ! nvvidconv ! “video/x-raw(memory:NVMM), format=(string)I420, width=(int)1920,height=(int)1080” ! nvoverlaysink overlay-w=1920 overlay-h=1080 sync=false
- Different applications can be supported by writing proper docker files.
Hope you got a fair understanding of how to integrate NileCAM25_CUXVR with balenaOS. If you have any queries around this, please reach out to camerasolutions@e-consystems.com.
Related cameras:
- e-CAM24_CUNX – Color Global shutter Camera for NVIDIA® Jetson Xavier™ NX / TX2 NX / Nano
- e-CAM24_CUXVR – 2MP Global Shutter Monochrome Camera for NVIDIA® Jetson AGX Xavier™
- See3CAM_24CUG – AR0234CS Full HD Color Global Shutter Camera
Vinoth Rajagopalan is an embedded vision expert with 15+ years of experience in product engineering management, R&D, and technical consultations. He has been responsible for many success stories in e-con Systems – from pre-sales and product conceptualization to launch and support. Having started his career as a software engineer, he currently leads a world-class team to handle major product development initiatives