


The output quality of an embedded camera depends on various factors such as the sensor resolution, pixel size, lighting conditions, choice of lens, etc. To ensure the reproduction of a target scene in true colors in an embedded system that operates in varied lighting conditions, white balance has to be set the right way. To do this, the Auto White Balance (AWB) feature in the ISP (Image Signal processor) must be tuned properly.
In addition to this, the lens used as it is in an embedded vision application might not give you the desired level of color reproduction. So, the lens also has to be calibrated properly for auto white balance.
Understanding key concepts related to auto white balance calibration
Before we look at how to do lens calibration for auto white balance, we need to learn some key concepts related to the same.
The relation between lens and auto white balance
As discussed before, many a time a lens integrated into an embedded camera system need not provide the required output in terms of color fidelity. The quality of color reproduction of a lens – and the amount of white balancing to be done – depends on the following factors:
- Lens material – whether it is plastic or glass.
- Color spectrum filters – filters used to allow lights of a specific wavelength to pass through a lens.
- CRA (Chief Ray Angle) – the angle of incidence of an off-axis ray on the lens plane.
- Anti-reflective coating in the lens – the coating used in lenses to reduce reflection.
Since the above factors negatively impact the color accuracy of the image output, a lens has to be properly tuned for white balance correction to achieve the desired image quality.
What is color temperature?
In layman’s terms, color temperature refers to the appearance of a target scene or object to a sensing device (this doesn’t mean that color temperature changes for different sensing devices. This is just a more simplistic explanation of what color temperature means. To learn more about the concept, please visit the article What is color temperature.
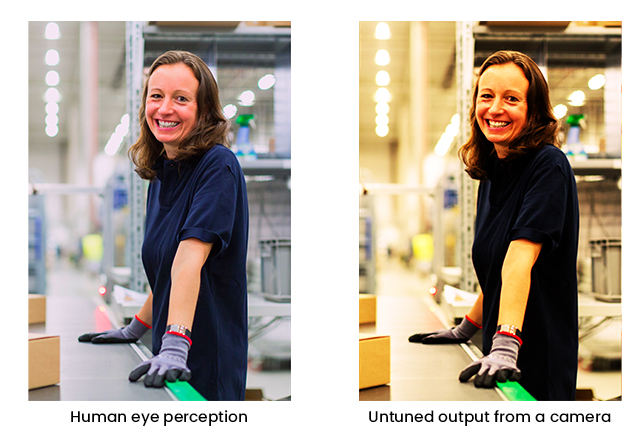
The color temperature value changes depending on the light source. For example, the light from a fluorescent bulb appears to be blue or green. Similarly, the light from a tungsten bulb tends to be darker shades of yellow and red. This variance in color temperature makes it difficult for camera modules to reproduce accurate color combinations of a target scene. While the human eye automatically adjusts to balance all these different color shades, a camera lens has to be ‘white balanced’ to make the output look as natural as possible.
Please have a look at the below figure to understand the difference between what a human eye sees and the output from a camera which is not corrected for white balance:
Usually, color temperature is measured in Kelvins. Warmer colors have color temperature in the range of 2300 – 3000K, whereas cooler colors have a color temperature in excess of 8000K. The color temperature of a neutral color (e.g. sunlight at noon) tends to be around 5500K.
In short, to mimic the human eye, different color shades must be balanced properly. This is where the auto white balance feature in an image signal processor can help. We will discuss the steps involved in calibrating a lens for auto white balance in detail in the next section.
How to do auto white balance calibration in embedded camera lenses
Lens calibration for auto white balance should be done for every single lens connected with the camera irrespective of the image sensor or image signal processor used. This would also mean that if you are using a filter such as the IR cut filter in your camera, you need to do the calibration separately. This is because the calibration done for the camera without a filter wouldn’t work when a filter is used.
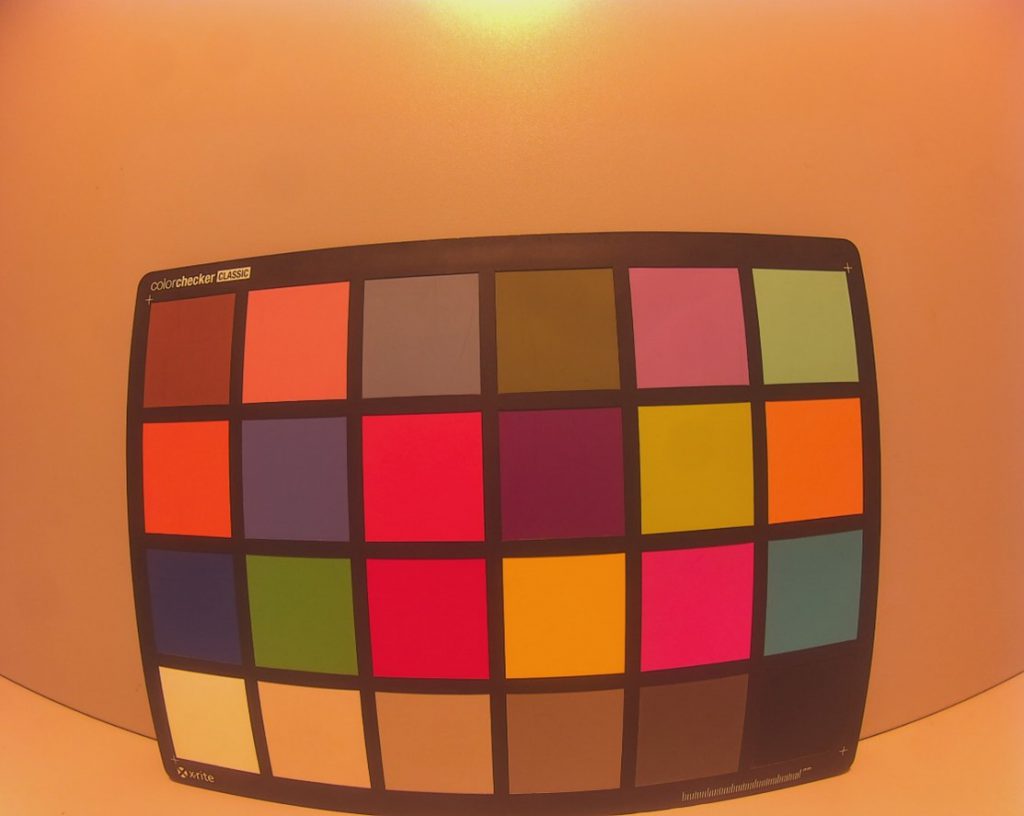
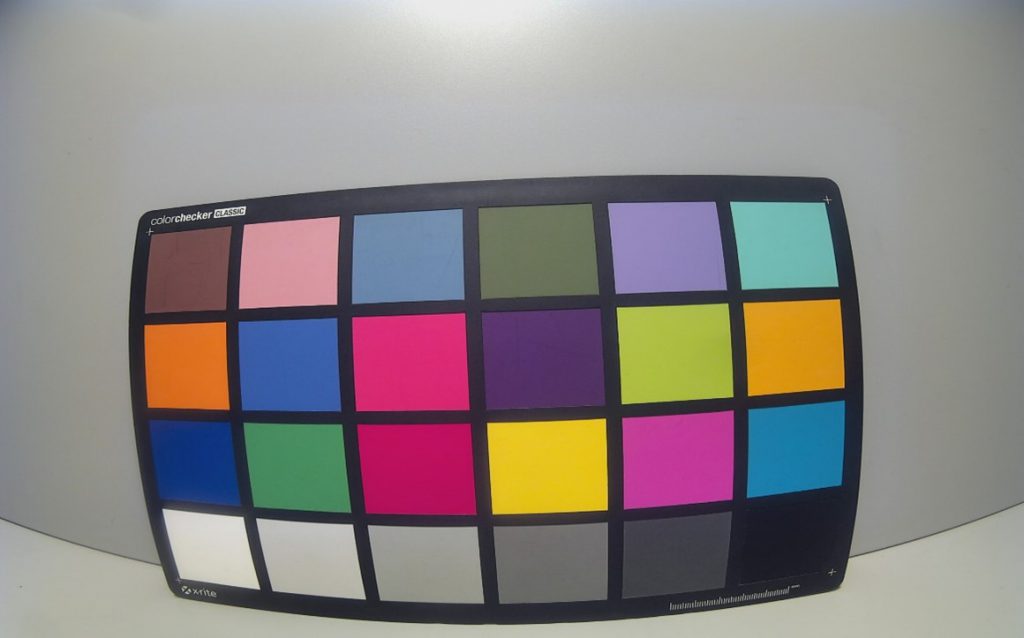
To calibrate a lens for auto white balance, images at different color temperatures such as horizon, fluorescence, cool white, etc. are captured inside a lightbox. A lightbox setup helps to simulate various real world lighting conditions at different color temperatures. The next step is to apply the auto white balance algorithm on the captured images.
The white balance algorithm negates the effect of different color shades that come from various light sources by finding the white point in the image. It then processes the image till the white point resembles actual white by continuously changing the color temperature.
To give you a better understanding, given below is the comparison of an image pre and post auto white balance calibration in the horizon light:
How e-con Systems helps product developers in lens calibration and other types of camera customization
We at e-con Systems help product developers choose the right lens to meet their application requirements. We also help them with the calibration process and eliminate issues like lens vignetting and color distortions. In addition to lens calibration, we do a varied set of customization services for our camera modules including ISP tuning, firmware changes, enclosure design, carrier board design, etc. Please visit the customization page to learn more about all the camera customization services we offer. We combine our customization and integration expertise with our wide portfolio of cameras to help product owners develop cutting-edge embedded vision systems. To learn more about the camera products we offer, please visit the Camera Selector. If you are looking for help in integrating cameras into your products, please write to us at camerasolutions@e-consystems.com.

Vinoth Rajagopalan is an embedded vision expert with 15+ years of experience in product engineering management, R&D, and technical consultations. He has been responsible for many success stories in e-con Systems – from pre-sales and product conceptualization to launch and support. Having started his career as a software engineer, he currently leads a world-class team to handle major product development initiatives