


Introduction:
This blog is intended to describe the External trigger usage function of the See3CAM_CU135 camera.
e-con Systems has designed cameras that support up to 13MP resolution, based on OnSemi’s AR1335 Image sensor. AR1335 is a top-rated 1/3.2-inch CMOS active-pixel digital image sensor with a pixel array of 4208H x 3120V. This 4K USB Camera is driven by 1.1µm pixel BSI technology, which delivers exceptional quality images.

Plug-and-Play:
Our See3CAM_CU135 camera is a UVC-compliant USB3 camera that supports Plug-and-Play interfaces. This camera work with standard USB Video Class drivers that are supported by Linux and Windows Operating systems. Our USB 3.0 cameras are also compatible with USB 2.0 ports. Hence, you do not have to install any additional drivers to use the cameras.
External Trigger:
See3CAM_CU135 USB cameras having External trigger options, which is used to capture the image and helps in synchronized streaming by connecting two or multiple cameras. The external trigger can be operated in the two modes
- Master Mode
- Trigger Mode
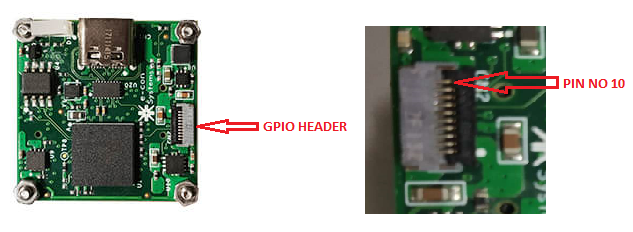
Both master mode and trigger mode use the same trigger pin 10 in the GPIO header
When the trigger pulse is given in GPIO pin in master mode, the camera start running in free-running mode
Trigger pulse given in GPIO pin in trigger mode, the preview is not available, the camera will be kept in standby mode waiting for an external trigger pulse to start streaming .
Master Mode:
The Master Mode of operation can be considered as a free-running mode of the camera. The camera is configured for a preview resolution and still resolution. The application starts streaming the video. By default, the camera configured in master mode
In the Master mode, the camera is configured for the specific preview resolution and frame rate and configure the camera settings such as exposure, still image resolution, still image storage location, and so on.
The still image pin can be configured for the required still capture resolution. The still image capture can be done in two methods as described below:
- Software Still Capture
- Hardware Still Capture
Software Still Capture
In the software still capture operation, the user has to initiate the still capture operation. User can capture the image by using software application like OpenCV, V4l2, and DirectShow application
For example, in our e-CAMView application (windows) users can capture images by either clicking the Get Still option in the e-CAMView application or press the Enter key of the keyboard. The image will be captured and stored in the location specified by the user.
Hardware Still Capture
In the Hardware still Capture mode, user can send a hardware trigger pulse to the external trigger pin 10 of the GPIO connector. This trigger pulse could have been generated by pressing a hardware switch connected to this external trigger pin. The camera controller recognizes this TRIGGER command and then captures the current frame, and it will be stored in the selected location on the host PC. It is the same as the Software Still Capture operation. Sample de-bouncing switch circuit image shown below
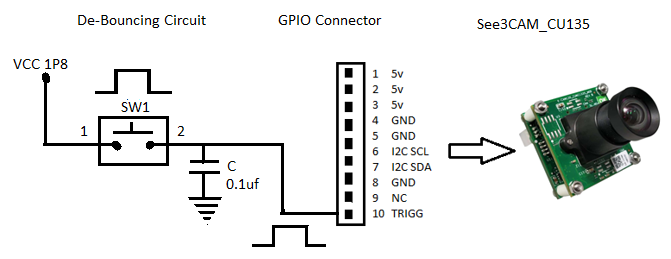
Voltage: 1.8V
Trigger Pulse: Single Trigger Rising Edge pulse
Trigger Mode:
In trigger mode, the camera will be kept in standby mode waiting for an external trigger pulse to start streaming. In this mode, the camera is capable of synchronized streaming by connecting two or multiple See3CAM_CU135 cameras to the same trigger source.
Before setting to the Trigger mode, the user can adjust the camera settings such as the preview resolution and frame rate and configure the camera settings such as exposure, brightness, etc while operating the camera in Master mode, once the camera enters Trigger Mode, the preview is not available, so cannot adjust the parameters without the preview.
After configuring the camera setting, change the streaming mode to “trigger mode”. Once streaming mode changed camera will not stream any frame and wait for the external trigger pulse, the external Trigger requires an active high 1.8V logic signal that can be given through pin 10 in the GPIO connector. The trigger pulse frequency is based on the frame rate required.
For example, if user wants to stream the camera in 1920 x 1080 @30fps, the user needs to set the external PWM pulse range as 30Hz and set the exposure time of the sensor as 33.33 ms.
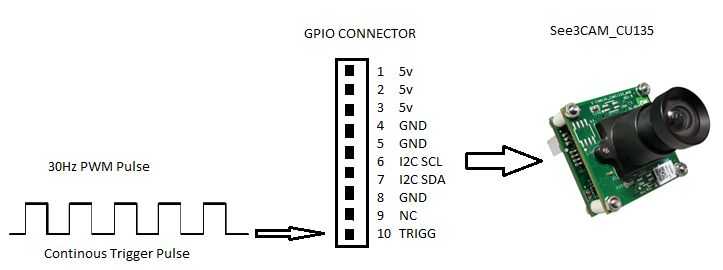
Voltage Level: 1.8v
External Trigger Pulse Frequency: 30Hz
Expected Frame Rate: 30fps
Trigger Pulse: Continuous Trigger pulse
Duty Cycle: No limitation in duty Cycle,
Minimum ON time: 10 us
Minimum Trigger period: 33 ms
What are all the changes that will occur while changing of External Trigger Pulse, exposure time, and Frame Time:
i) Proper Frame:
We need to keep the exposure time equal to the frame time (Frame rate) and the external trigger pulse time. In this condition, you will get the proper frame with the desired frame rate from the camera. The sample image is shown below
ii) Overexposed frame:
An overexposed frame will occur in the following condition. If the exposure time greater than the frame time (Frame rate) and external trigger pulse time. In this condition, you will get the overexposed frame from the camera, but the frame rate drops to half the external trigger pulse frequency. The sample image is shown below

iii) Underexposed frame:
An underexposed frame will occur in the following condition. If the exposure time less than the frame time (Frame rate) and external trigger pulse time. In this condition, you will get the underexposed frame from the camera, but you will get the desired frame rate. The sample image is shown below

iV) Uneven exposed frame:
The uneven exposed frame will occur in the following condition. If the exposure time less than the frame time (Frame rate) and also frame time (Frame rate) less than the external trigger pulse time. In this condition, you will get the uneven exposed frame from the camera, but you will get the desired frame rate. The sample image is shown below

Hope this blog gave you an explanation about external trigger functionality of See3CAM_CU135 camera. This external trigger functionality explanation is same for other See3CAM’s cameras such as See3CAM_CU55M, See3CAM_CU20, See3CAM_CU22.
For more information, please contact techsupport@e-consystems.com

Rathish, Our tech support expert with rich 6+ years of experience. He has been a key person in addressing and solving crucial technical queries with wide range of scenarios related to OEM camera hardware and software.