

In our previous article, we explored the process of loading a Custom Vision AI Model and deploying it with the EdgeECAM50_USB device.
In this current article, we will guide you through the process of performing inference with a Vision AI model and provide insights on how users can visualize the model’s output.
One of the crucial steps in any machine learning project is understanding and interpreting the results generated by your trained model. Visualization plays a vital role in conveying the model’s predictions and insights in a clear and intuitive manner. Let us now delve into the inference process and visualization of the model’s output.
What is Inference mode, and what are the steps involved in performing Model Inference?
In Inference mode, camera will have only one resolution enumerated which will be the Custom resolution 1*. Internally Custom resolution 2 will be given to the model for inferencing. For more details, refer blog – Bring your own Model (BYOM) and deploy it with EdgeECAM50_USB?. In this mode, you can start/stop inference if model is loaded. You can enable overlay and view the output on the application if the post processing module is selected. Rest of the features in the application would be inactive.
*– Default will be 920x920p. Y8 at 12 fps.
You can select the inference mode as shown in below figure.
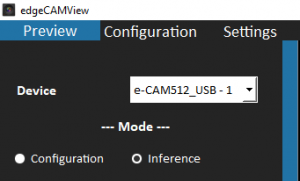
Figure 1: Inference Mode
Step 1: Start/Stop Inference
Once you start inference, you can view the output data from the model being displayed in the output section, as illustrated in the following example.
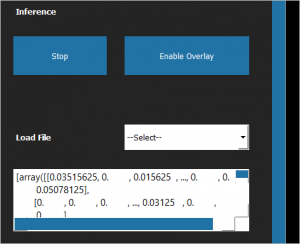
Figure 2: Raw Model Output
This is the raw model output from the camera. It will be a Python list of output tensors.
Step 2: Load e-con Systems’ Sample/ Customized Post-Processing Module
e-con Systems’ model hub provides sample post-processing modules for reference. Also, we offer guidance for developing your own post-processing module.
The post-processing of the model’s output will vary depending on the specific model being used. To overlay the output on the preview, it is necessary to convert the output into meaningful data such as bounding boxes, labels, and scores through a post-processing module. This module plays a crucial role in transforming the raw output from the camera into the desired format based on the task at hand, whether it is detection, regression, or classification. Subsequently, these processed results can be overlaid onto the preview image.
How to load e-con Systems’ sample post processing module?
To load e-con sample post processing module, select any sample post-processing module from Load File drop-down list box as shown below.
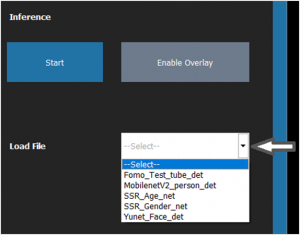 Figure 3: Loading e-con sample Post Processing Module
How to load your own post processing module?
Customized post-processing module allows you to overlay the model output of your own model with the edge-CAMView application. To create a custom post-processing module, you will need to implement the OutputDecoderInterface, which consists of four core methods.
To create a custom post-processing module, follow these steps:
- Create a new python file with a “.py” extension, giving it a name that reflects the post-processing module.
For example, if you want to create a post-processing module for MobileNetV2 person detection, you can name the file “MobileNetV2_person_det.py”.
- Import Packages (failing to import these will make the script unusable by application).
The options to import packages are:
- from interface.output_decoder import OutputDecoderInterface.
- from interface_utils.labelboundingboxscore import LabelBoundingBoxScore.
- Create the class as same as the file name and inherit the OutputDecoderInterface class.
- Implement the following four inference methods:
- get_output_labels() should return a list of class labels in string format.
- decode_output() should return a dictionary of bounding boxes, label, and score values. The LabelBoundingBoxScore() API is designed to handle the model output values to bounding box coordinates and scores. If there are multiple objects of interest present, a bounding box for each will be returned. The output here is same as that you view in output box when you start inference in the edge-CAMView application.
- get_task() should return the task, such as classification, detection, or regression, as a string. For regression, the score value must be filled in the LabelBoundingBoxScore() inside decode_output() method above, and for classification, the label index must be filled in the label variable, and for detection, the bounding box, label and score must be filled inside LabelBoundingBoxScore() method.
- get_model_input() should return tuple of input image size.
The example of implementation of four inference methods is shown in below figure.
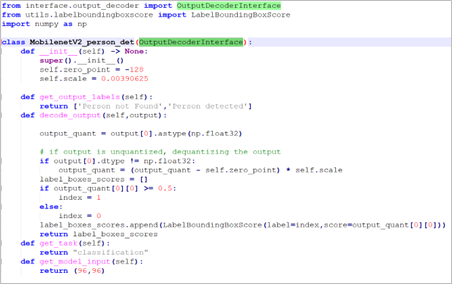 Figure 4: Implementation of Four Inference Methods
For a more comprehensive understanding of the process of creating or adding a post-processing module, you can refer to the EdgeECAM50_USB Model Pack GitHub page.
To add your custom post processing module, follow these steps:
- Find the install directory of the edge-CAMView application.
By default, install directory is C:\Program Files (x86)\e-con Systems\edge-CAMView. - Create a new folder with a name that matches your desired script name, within the post_process directory.
- Paste your custom post-processing Python script inside the newly created folder. Ensure that the name of the Python script file is the same as the name of the folder.
- Make sure that the class name inside the Python script is the same as the name of the Python script file.
Note: You should be familiar with Python to create your own custom class wrapper. Additionally, ensure that your model is compatible with the OutputDecoderInterface API and all above core methods could be implemented.
If the user is using any other Python packages in the post processing module. The package needs to be placed in the installation directory of the edge-CAMView application.
Step 3: Enable Overlay
Click Enable Overlay to generate visual overlays on the camera preview. The application will utilize the post-processing script you have implemented to process the model’s outputs.
This feature can be particularly useful in verifying the accuracy and usability of the model in its target environment. With the overlay, you can view the model’s detections in real-time and adjust the model’s settings as needed to optimize its performance. This way, you can ensure that the model meets your specific needs and requirements.
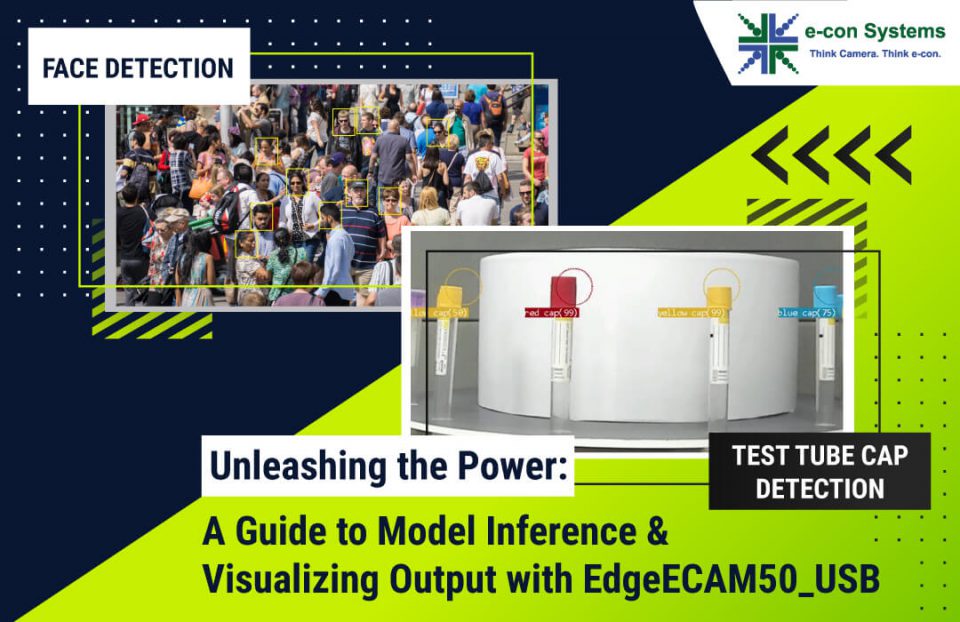
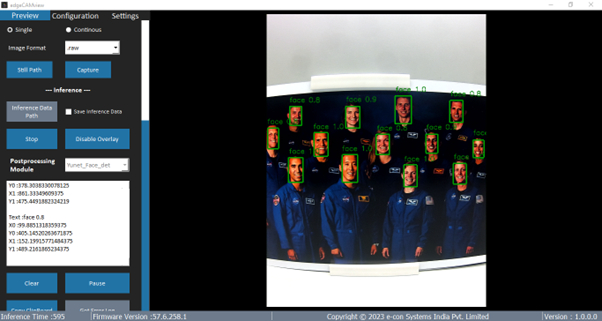
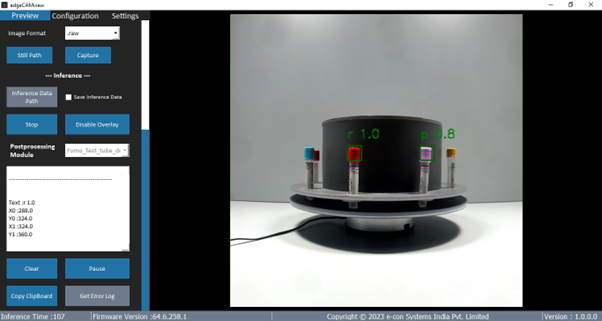
Step 4: Visualize Model’s Output
Here we present the output generated by our existing models.
Face detection
Test tube cap detection
 We hope this blog has provided you with valuable insights and practical guidance on how to perform model inference and visualize the output effectively. By leveraging these techniques, you can unlock the full potential of your Vision AI models and gain deeper insights from your data.
e-con Systems’ EdgeECAM50_USB – AI Smart USB Camera
The EdgeECAM50_USB camera, developed by e-con Systems, is designed for In-Vitro Diagnostics, pre-analytical tasks such as tube classification, cap identification, liquid level detection, and so on. It equipped with a high quality 5MP low noise onsemi® AR0521 CMOS image sensor. The camera incorporates a powerful dual-core processor, enabling the execution of AI and machine learning algorithms directly on the camera itself. It seamlessly integrates popular frameworks such as TensorFlow Lite Micro, GLOW, and DeepviewRT. Additionally, the camera features an on-board high-performance ISP that provides convenient functionalities such as auto exposure and auto white balance.
If you would like to know more about the EdgeECAM50_USB and its customizable features, please contact sales@e-consystems.com.

Suresh Madhu is the product marketing manager with 16+ years of experience in embedded product design, technical architecture, SOM product design, camera solutions, and product development. He has played an integral part in helping many customers build their products by integrating the right vision technology into them.