

In general, deploying a vision AI model onto a camera can depend on the target device, the model you are using, and the framework or software development kit (SDK) you are working with.
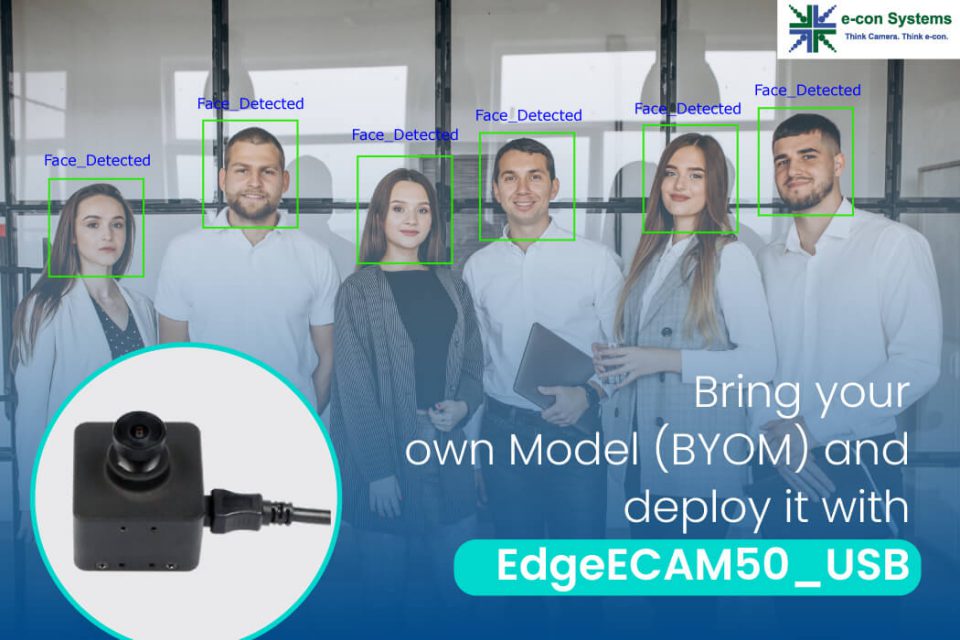
EdgeECAM50_USB product includes Deep learning (DL) inference capabilities and allows you to deploy TensorFlow Lite Micro models onto the device.
You can deploy his model in our device and execute it and visualize the inference results of it with the help of our edge-CAMView application. Each model might have a different input resolution, color space, etc. With edge-CAMView, You can configure the camera to stream the desired ROI and required resolution in Y8 and UYVY formats.
Throughout this blog post, we will cover the prerequisites for deploying your own model with EdgeECAM50_USB.
What are the prerequisites to deploy the model?
To deploy the model, you would typically need to fulfill the following prerequisites:
- Edge-CAMView application Installation
- EdgeECAM50_USB product kit
- Model: TFLite Micro Model in .tflite format
How to configure the camera for your model?
By default, EdgeECAM50_USB has two operating modes.
Dataset Mode – When the device is set in this mode, you can configure the custom resolutions/model details, generate config files and write them onto the device.
Inference Mode – When the device is set in this mode, you can start/stop inference if the model is deployed. You can enable overlay and visualize the inference output on the live preview by writing your own post-processing module for your model.
We have two custom resolutions in the device which will either be in Y8 or YUV422, depending on the input configurations. These resolutions can be modified by the user, and the ROI for those resolutions can also be set by the user.
The resolutions in this Dataset mode are listed below table as follows:
| Format | Resolution | Frame Rate |
| USB 2.0 | ||
| UYVY | 960p (1280 x 960) | 8 fps |
| Y8 | 960p (1280 x 960) | 16 fps |
| Custom Format | Custom resolution 1* | – |
| Custom format | Custom resolution 2* | – |
Table 1: Supported Resolutions and Frame Rates of e-CAM512_USB
*-Custom resolutions 1&2 can be configured by the user based on the requirements. By default, these values are 960x960p and 320x320p, Y8 at 12fps.
Only the custom resolution 1 will stream, and the custom resolution 2 will be given as input to the model. To configure the camera, follow these steps:
- Set Custom resolution 1 using the below steps:
- Select the Region of Interest (ROI) in the User Interface (UI) by clicking and dragging the mouse in the preview.
- Set the required Resolution Width and Resolution Height. This will be the custom resolution 1 and your preview resolution while inferencing. Your screen appears like the one shown below. The format for this resolution will be based on the model input channel.
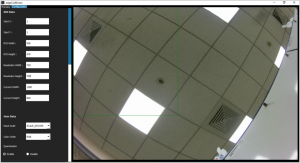 Figure 1: Custom Resolution 1 in edge-CAMView Application
- Set Custom resolution 2 using the below, which will be given as input to the ML model in inference mode.
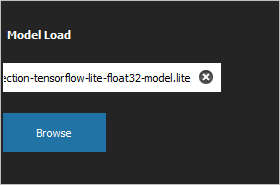 Figure 2: Load from Model
- First, select your model by Clicking Browse to import the Tensorflow lite model file. Any .tflite micro model that fits within our size range can be loaded. From this, model data will be extracted and added to the configuration file with all the required details, which will be generated later.
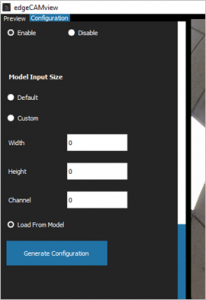 Figure 3: Model Input Size Menu
-
- You can view the Model Input Size option as shown in the above figure. Select Load From Model. This will extract the input size from the model and set the custom resolution 2 to the input size.
3. Select the input scale and color order from Input Scale and Color Order drop-down list box in the User Data
You can view the User Data option as shown in the below figure.
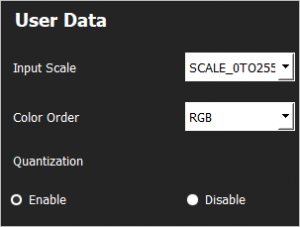 Figure 4: User Data Selection
- After all the configuration parameters are set, Click Generate Configuration to generate a .config file, as shown below.
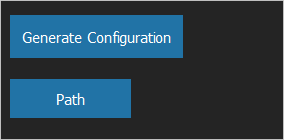 Figure 5: Generate Configuration
This file is a user-readable and editable Protobuf file, which represents the configuration made by the user. The data in this file will be used to configure the camera.
The configuration file can also be generated without first loading the model. This will set the custom resolution 1 to the preview_roi values. In contrast, the custom resolution 2 will be either default 320×320 pixels or user-selected custom resolution (using the custom input option in model input size). This could be useful when attempting to construct a dataset from the device without a model in hand.
However, to allow for the inference to run on the device, the model_data values must be included in the configuration file. To do so, first, load the model and then select Generate Configuration.
How to deploy with EdgeECAM50_USB?
Now that the generation of the config file has been performed, let us discuss how to deploy with the EdgeECAM50_USB.
To deploy with EdgeECAM50_USB, follow these steps:
- Click Write Config to write the configuration from the .config file onto the camera. This resets the device to put the configuration into effect.
- Click Write Model to deploy the model onto the camera, which will be used for inferencing.
Finally, you can view the current configuration present in the device by clicking Read Config. Sample image listing the current configuration.
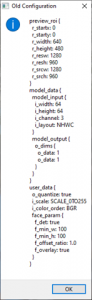
Figure 6: Listing Current Configuration
Using e-con Systems’ EdgeECAM50_USB Model Pack
The user can also use the models provided by e-con Systems for evaluation. The model names and its task are listed in the following table.
| Model Name | Task Type |
| Face detection | Detection |
| Age detection | Regression |
| Gender classification | Classification |
| Person detection | Classification |
| Test Tube cap detection | Constrained object Detection |
You can download the model pack from the Github repo, which will contain the model file along with their configuration files and post-processing modules.
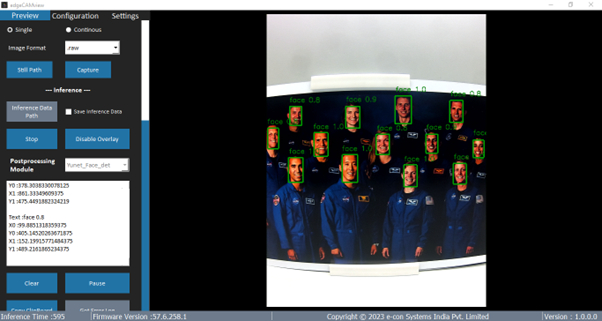 We have addressed the steps for configuring the EdgeECAM50_USB for deploying your own model. The next step would be to visualize the inference output from the camera, as shown in the above image.
Interested in knowing about this?
Stay tuned as we will explore this in detail in the upcoming blog post!
Suresh Madhu is the product marketing manager with 16+ years of experience in embedded product design, technical architecture, SOM product design, camera solutions, and product development. He has played an integral part in helping many customers build their products by integrating the right vision technology into them.