

It is commonly known that the exposure in the camera can be altered to achieve the target luminance (the Y value of the overall frame) in a scene. And cameras support two different exposure modes – manual exposure and auto exposure. As the name suggests, the user adjusts the exposure time in the manual exposure mode to ensure a well-illuminated scene. In comparison, the exposure time will be calculated by the ISP in the auto exposure mode.
Since the camera’s exposure and frame rate are directly dependent, exposure compensation is used to achieve the required frame rate along with the target luminance in auto exposure mode.
In this blog, you’ll find out how each exposure mode works in detail, along with the limitations, benefits, and use cases of exposure compensation.
What is the Manual Exposure Mode?
The exposure value set in the manual mode will be directly written to the sensor registers using the ISP. As the frame rate changes with the exposure value, higher exposure values will have a lower frame rate, whereas lower exposure values will have a higher frame rate. Since the sensor starts the readout only after complete integration, the frame rate will depend on the exposure time.
The user must be mindful of controlling the exposure in manual mode. For example, if the user sets a value of 33ms exposure time in the camera. The frame rate will be 30FPS irrespective of the scene. If the scene is dark, then the image will be exposed properly. However, the image will be overexposed if the scene is bright. So, the user has to control either the exposure alone or both the exposure and gain manually to meet the target luminance and the frame rate.
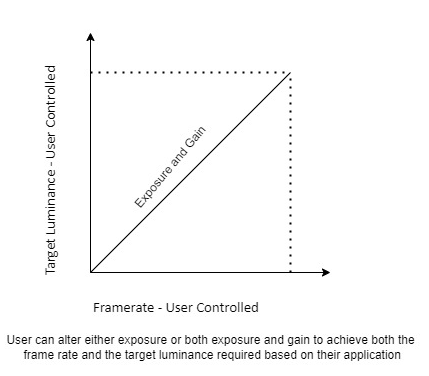 Fig 1 – Manual Exposure
Use cases of Manual Exposure
Manual exposure can be used in controlled lighting environments where the overall luminance of the scene is fixed (e.g., photo booths, digital microscopes, etc.). But it can’t be used in places with dynamic lighting or external environment. The auto-exposure mode is better suited for these conditions.
What is the Auto Exposure Mode?
In the auto-exposure mode, the exposure value is calculated by the ISP by analyzing the luminance in the scene. The exposure value is altered such that it meets the target luminance. The target luminance can be met by altering both the sensor’s gain and exposure values. Also, the exposure value will be low for a well-illuminated scene and vice versa – as the exposure time is dependent on the scene brightness. Hence, the frame rate will also vary depending on the same. The ISP generally takes 1-2 frames to settle the exposure time.
The major concern of auto exposure mode is that the frame rate drops because of higher exposure value in low light conditions. To handle this, there is a feature called exposure compensation, which limits the auto-exposure algorithm’s upper limit in the exposure range.
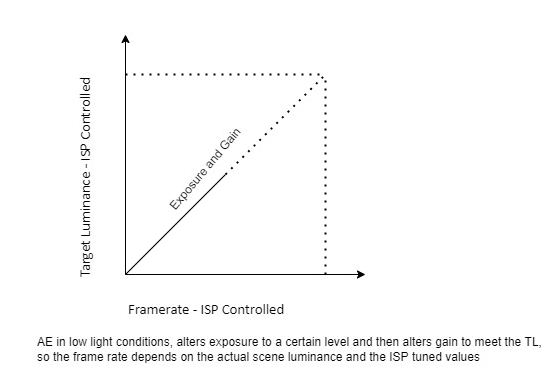 Fig 2 – Auto Exposure
Use cases of Auto Exposure
Auto exposure is used in dynamic lighting conditions. It is popular in outdoor-based applications, such as:
Exposure Compensation – Achieving the right frame rate
Exposure compensation (also known as exposure priority) limits the exposure time in auto-exposure mode to achieve the required frame rate. However, the target luminance can be achieved by controlling the gain value.
Let’s consider a scene in which the illumination is dark – and the auto-exposure algorithm in the camera tries to set a high exposure value. The scene will end up being well exposed, but unfortunately – the frame rate will drop. So, to avoid this, the user can use exposure compensation – ensuring that the exposure time won’t increase after the specified value. And scene also gets maintained in the same exposure as the gain value increases.
How Exposure Compensation works
In the auto-exposure mode, the ISP calculates the exposure time to obtain the best-illuminated scene. It’s important to note that exposure compensation limits the exposure that can be set in auto-exposure mode. Therefore, the exposure calculated by the ISP will not be set more than the value set in exposure compensation. So, the scene will not be well-exposed.
However, the ISP will increase the gain value to achieve the target luminance to achieve the same scene. This will prevent the frame rate from dropping as the exposure time will be limited. And the scene will also be exposed to the same illumination as before.
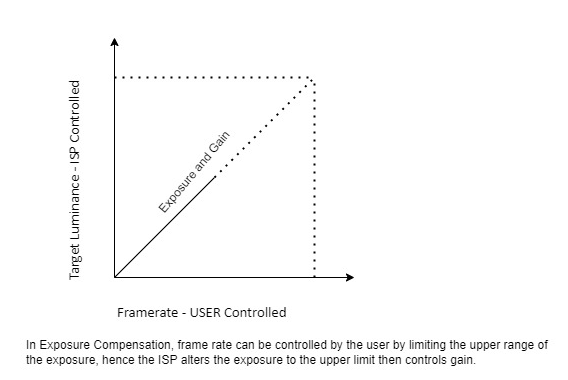 Fig 3 – Exposure Compensation or Exposure Priority
Limitations of Exposure Compensation
The limitation in exposure compensation is that the image would be affected by noise. The increase in gain produces noise in the image, which can introduce what is called the ‘salt and pepper’ noise. So, it’s fair to assume that the image quality will get affected in low-light conditions.
Use cases of Exposure Compensation
Smart traffic applications are the top use cases for exposure compensation. Hence, the camera would be running 24 hours a day – exposed to daylight and nightlight conditions. While running during the daytime, the ISP will set a lower exposure value due to the good lighting conditions. During the nighttime, the ISP will set a higher exposure value to achieve the same scene in a low-lighting condition.
Since setting a higher exposure value causes the frame rate to drop, traffic monitoring will get affected. To avoid this, the exposure compensation changes the gain settings and achieves the same scene by limiting the exposure range and increasing the gain value. It means that the scene luminance and the frame rate are effectively maintained.
Conclusion
Custom-building a camera solution that can adapt to different lighting conditions is often a complex journey – full of unforeseen speed bumps. Hence, it is highly recommended to work alongside an imaging expert with experience in building customized camera solutions with integrated auto-exposure capabilities.
e-con Systems, with 18 years of experience as an OEM Camera Solution Provider, can help you build the perfect embedded vision applications – suited for any lighting condition.
If you want help integrating a camera into your product, please write to us at camerasolutions@e-consystems.com. Please visit the Camera Selector page to get a complete view of our camera portfolio.

Vinoth Rajagopalan is an embedded vision expert with 15+ years of experience in product engineering management, R&D, and technical consultations. He has been responsible for many success stories in e-con Systems – from pre-sales and product conceptualization to launch and support. Having started his career as a software engineer, he currently leads a world-class team to handle major product development initiatives