

Recently, Texas Instruments’ TDA4VM Edge AI Starter Kit (SK) has hit the embedded vision market as an affordable and compact board solution. It is all set to help smart cameras, autonomous robots, and other advanced devices to see, think, and act with more speed and precision. You can run the TDA4VM evaluation kit on Linux and quickly leverage frameworks like TensorFlow Lite during your product development journey.
In this blog post, we’ll go through the steps involved in running deep learning models on TI – TDA4VM with camera streaming.
What does the TDA4VM evaluation kit comprise?
TI’s TDA4VM SoC houses dual-core A72, high-performance vision and video codec accelerators, as well as high bandwidth real-time IPs for capture and display. It also comes with the following:
- Latest C71x and C66x DSP
- GPU
- Dedicated safety island
- Security accelerators
Let’s look at how we can enable camera streaming – using e-con Systems’ NeduCAM25 – a full HD global shutter color camera module with an FPD-Link III serializer and a 15-meter coaxial cable with FAKRA connector. Some of NeduCAM25’s other highlights include:
- AR0234 full HD global shutter camera module
- External trigger support for synchronized multi-camera streaming
- On-board high-performance ISP
- Dust and waterproof IP67-rated enclosure (optional)
Prerequisites to enable camera streaming
You need to make sure that you meet all the prerequisites. So, firstly, connect the components to the SK, as shown in the image below:
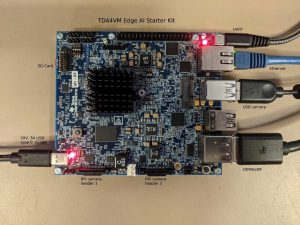 Figure 1 – Connecting to the TDA4VM Edge AI Starter Kit
As you can see, the board should be flashed with the NeduCAM25 image.
You can follow the instructions here.
Getting started with the camera stream integration
It’s important to make sure that you have connected the UART cable to connect the TI kit to use the minicom. Then, open the terminal in the Linux system.
Use the below command to connect with the TI kit using minicom:
$sudo minicom -D /dev/ttyUSB2 -c on
If Minicom is not installed:
$sudo apt-get install minicom
Once Linux boots, log in as a root user with no password.
To run the sample demo on the TI dev kit, move to the python_app folder and run the following command:
root@tda4vm-sk:/opt/edge_ai_apps/apps_python# ./app_edgeai.py ../configs/image_classification.yaml
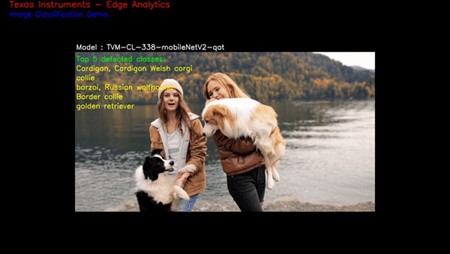
Figure 2 – Sample output for image classification and object detection demos
How to run the sample application using camera streaming
Use the following command to check whether the camera is detected and then note the video node:
root@tda4vm-sk:/opt/edge_ai_apps# ./init_script.sh
CSI Camera 0 detected
- device = /dev/video2
- name = ar0234 8-0044
- format =v
- subdev_id = 2
- isp_required =
Use the following gstreamer command to check whether the camera is working and then start the camera streaming:
For cam1 # gst-launch-1.0 v4l2src num-buffers=-1 device=/dev/video2 io- mode=5 ! “video/x-raw,width=1280,height=720,format=UYVY” ! fpsdisplaysink video-sink=autovideosink text-overlay=false sync=false -v
To run the demo model using the camera, you need to do the below changes in the configuration file:
The demo config file uses the YAML format to define input sources, models, outputs and flows, which define how everything is connected.
The config files for out-of-box demos are kept in edge_ai_apps/configs folder. The folder contains config files for all the use cases and multi-input and multi-inference cases. The folder also has a template YAML file app_config_template.yaml.
The config file is divided into 4 sections:
- Inputs
- Models
- Outputs
- Flows
For example: Let’s take the face detection model.
Move to the folder configs, and to edit the file, use the following command:
root@tda4vm-sk:/opt/edge_ai_apps/configs# vi face_detection.yaml
Title: “Face Detection Demo”
Log_level: 2
Inputs:
- input0:
- source: /dev/video2
- format: UYVY
- width: 1280
- height: 720
- framerate: 30
Models:
- model0:
- model_path: /opt/model_zoo/ONR-OD-8420-yolox-s-lite-mmdet-widerface-640x
- topN: 5
Outputs:
- output0:
- sink: kmssink
- width: 1920
- height: 1080
- output1:
- sink: /opt/edge_ai_apps/data/output/videos/output_video.mkv
- width: 1920
- height: 1080
- output2:
- sink: /opt/edge_ai_apps/data/output/images/output_image_%04d.jpg
- width: 1920
- height: 1080
Flows:
- flow0:
- input: input0
- models: [model0]
- outputs: [output0]
Mosaic:
- mosaic0:
- width: 1280
- height: 720
- pos_x: 320
- pos_y: 180
Make the changes and exit.
To run the face detection model, move to the python apps and run the command:
root@tda4vm-sk:/opt/edge_ai_apps/apps_python# ./app_edgeai.py ../configs/face_detection.yaml
Output:
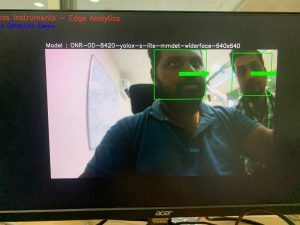
Figure 3 – face detection model output
The single-input, multi-inference demo takes a camera input and runs multiple networks on each of them.
Make the same changes in the config file of Single_input_multi_infer.yaml file and run the following command:
root@tda4vm-sk:/opt/edge_ai_apps/apps_python# ./app_edgeai.py ../configs/single_input_multi_infer.yaml
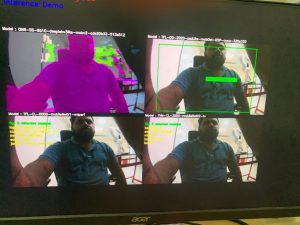
Figure 4 – Output of multiple inference model running with single video input
To wrap up
We hope we’ve clarified all the queries you may have had about using camera streaming and running a deep learning model on the TI Edge AI kit TDA4VM.
In an upcoming blog post, we’ll take you through the steps of using multiple cameras with the multiple inference model run.
For more information about our unique four-synchronized global shutter FPD-Link III camera with 15m cable support, go to the product page.
To know more about our products, check out the Camera Selector page.
Suresh Madhu is the product marketing manager with 16+ years of experience in embedded product design, technical architecture, SOM product design, camera solutions, and product development. He has played an integral part in helping many customers build their products by integrating the right vision technology into them.