

As you’re already aware, NVIDIA’s Jetson AGX Orin™ is rapidly emerging as a perfect ideal platform for building autonomous robotic systems – powered by edge AI. After all, this platform is unmatched in performance and efficiency as it gives you the flexibility to create the next generation of AI solutions with the latest NVIDIA GPU technology.
NVIDIA® Jetson Orin™ modules have up to 275 Trillion Operations per Second (TOPS) and 8X the performance of the last generation for multiple concurrent AI inference pipelines. Furthermore, they come with high-speed interface support for multiple sensors – making them the ideal solution for a new age of robotics.
In this blog, you’ll discover how to get started working with ROS2 Foxy on Nvidia Jetson AGX Orin for robotics applications.
You’ll also get to know how to work with an embedded camera in the ROS workspace.
We used the NileCAM81, an 8MP GMSL2 camera developed by e-con Systems, to demonstrate this application. It can stream high frame rate uncompressed video data of HD at 60 fps, FHD at 60 fps, and 8MP at 16 fps up to a distance of 15 meters with very low latency.
Prerequisites of installing ROS2 on Orin
Before we get started on learning to use the ROS2 Foxy on Nvidia Jetson AGX Orin – let’s find out the prerequisites so that you aren’t caught off-guard later.
- Nvidia AGX Orin flashed with the latest jetpack (Currently, Jetpack 5.0.2 is installed)
- NileCAM81 – Camera Binary should be installed (Any camera can be used)
Now, let’s understand how to install ROS2 on Orin.
How to install ROS2 on Orin
 Please follow the official steps for installing ROS here.
Set up the workspace
- Open the Terminal and create a workspace and move to the folder
mkdir -p ~/ros2_ws/src

cd ~/ros2_ws/src/
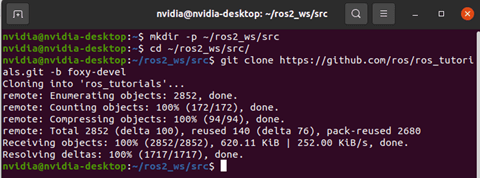 Add the ROS tutorials to the workspace
git clone https://github.com/ros/ros_tutorials.git -b foxy-devel
- Add the package dependencies
cd ~/ros2_ws/

rosdep install -i --from-path src --rosdistro foxy -y
 Colcon Build – Build your workspace
sudo apt update

sudo apt install python3-colcon-common-extensions

colcon build
 Source the created workspace in Bash file
sudo apt-get install gedit

gedit ~/.bashrc
Add the following line to the bottom of bashrc file
source ~/ros2/install/setup.bash
- Create a Package
Open a new terminal
cd ~/ros2_ws/src
Now, let’s create a package named cv_basics.
ros2 pkg create --build-type ament_python cv_basics --dependencies rclpy image_transport cv_bridge sensor_msgs std_msgs opencv2
- Create the Python script for Publisher and Subscriber
Move to the cv_basics package
cd ~/dev_ws/src/cv_basics/cv_basics
Create the Pub script
gedit webcam_pub.py
Copy and paste the below code:
import rclpy

from rclpy.node import Node

from sensor_msgs.msg import Image

from cv_bridge import CvBridge

import cv2

class ImagePublisher(Node):

def __init__(self):

super().__init__('image_publisher')

self.publisher_ = self.create_publisher(Image, 'video_frames', 10)

timer_period = 0.1

self.timer = self.create_timer(timer_period, self.timer_callback)

self.cap = cv2.VideoCapture(0)

self.br = CvBridge()

def timer_callback(self):

ret, frame = self.cap.read()

if ret == True:

self.publisher_.publish(self.br.cv2_to_imgmsg(frame))

self.get_logger().info('Publishing video frame')

def main(args=None):

rclpy.init(args=args)

image_publisher = ImagePublisher()

rclpy.spin(image_publisher)

image_publisher.destroy_node()

rclpy.shutdown()

if __name__ == '__main__':

main()
Create the Sub script
gedit webcam_sub.py
Copy and paste the below code:
import rclpy

from rclpy.node import Node

from sensor_msgs.msg import Image

from cv_bridge import CvBridge

import cv2

class ImageSubscriber(Node):

def __init__(self):

super().__init__('image_subscriber')

self.subscription = self.create_subscription(

Image,

'video_frames',

self.listener_callback,

10)

self.subscription

self.br = CvBridge()

def listener_callback(self, data):

self.get_logger().info('Receiving video frame')

current_frame = self.br.imgmsg_to_cv2(data)

cv2.imshow("camera", current_frame)

cv2.waitKey(1)

def main(args=None):

rclpy.init(args=args)

image_subscriber = ImageSubscriber()

rclpy.spin(image_subscriber)

image_subscriber.destroy_node()

rclpy.shutdown()

if __name__ == '__main__':

main()
- Modify Setup.py
Move to the Setup.py
cd ~/ros2_ws/src/cv_basics/

gedit setup.py

entry_points={

'console_scripts': [

'img_publisher = cv_basics.webcam_pub:main',

'img_subscriber = cv_basics.webcam_sub:main',

],

},
- Build the package
cd ~/dev_ws/

rosdep install -i --from-path src --rosdistro foxy –y
If the above command throws any error, then before building make sure the dependencies are named as below
cd ~/dev_ws/src/cv_basics
gedit package.xml
<depend>rclpy</depend>

<depend>image_transport</depend>

<depend>cv_bridge</depend>

<depend>sensor_msgs</depend>

<depend>std_msgs</depend>

<depend>python-opencv</depend>
Build the Packages:
colcon build --packages-select cv_basics
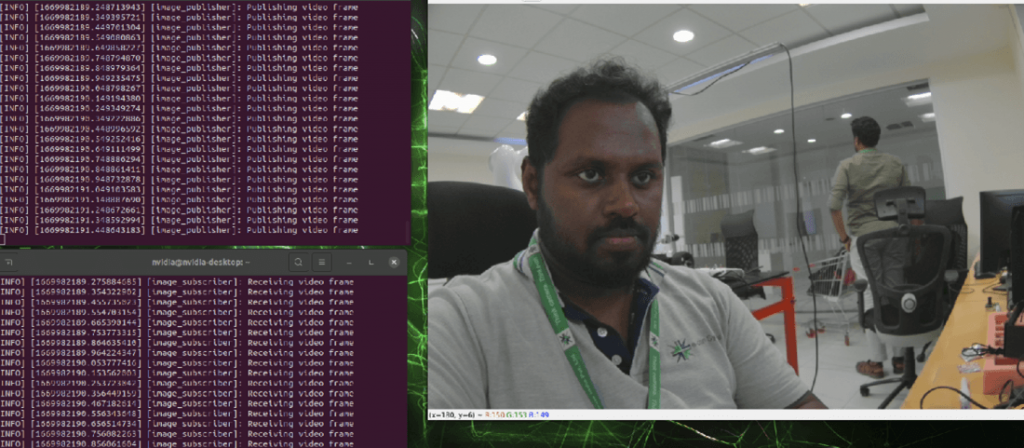
- Running the ROS nodes.
Finally, all the setup is done. Now let us check the output.
Open the terminal
cd ~/ros2_ws/

ros2 run cv_basics img_publisher
Open the other terminal
ros2 run cv_basics img_subscriber
As you can see below, a camera window will then pop up.
Final note
We hope we were able to break down the nitty-gritty of how to effortlessly start working with the ROS2 Foxy on NVidia Jetson AGX Orin for robotics applications.
Stay tuned for our next blog, as we will see how to use face detection capabilities by using OpenCV.
For more details about the camera, please visit our product page. To check out e-con Systems’ entire camera portfolio, explore our Camera Selector page.
Please note that this content has been produced by referencing the official documents of ROS2. You can find them here. We also referred to the material published by Automatic Addison.

Vimal Pachaiappan works as a Computer Vision Engineer at e-con Systems. He holds a master’s degree from Vellore Institute of Technology. With 5 years of experience in embedded vision solutions, he is specialized in computer vision, robotics, IoT, AWS and AI. Currently Vimal is developing Vision based AI applications, and assisting customers for camera solutions with his expertise throughout the product development cycle.