

In one of the previous articles, we learned how to run camera streaming on ROS2 foxy with rospy. If you are interested in knowing how it is done, we recommend you check it out using the link below:
All you need to know about how to install ROS2 on Jetson Orin – using NileCAM81.
It will be a good precursor to this article where we dive deep into running a face detection algorithm on ROS2 foxy.
For this application, you need to download this file and save it in the location where the publisher and subscriber script are placed.
 Figure 1 – Haar-Cascade Face Detection Algorithm
The Haar-Cascade Face Detection Algorithm is a sliding-window type algorithm that detects objects based on its features.
Haar Face Features
The Haar-Cascade model employs different types of feature recognition such as the size and location of certain facial features. To be specific, nose bridge, mouth line, and eyes – with the eye region being darker than the upper-cheek region and the nose bridge region being brighter than the eye region.
Intel’s ‘haarcascade_frontalface_default.xml’
This XML file contains a pre-trained model that was created through extensive training and uploaded by Rainer Lienhart on behalf of Intel in 2000. Rainer’s model makes use of the Adaptive Boosting Algorithm (AdaBoost) in order to yield better results and accuracy.
How it works
In the model, the haar features in the image given below are utilised. They resemble our convolutional kernel. Each feature is a single value that is obtained by deducting the sum of the pixels under the white and black rectangles.
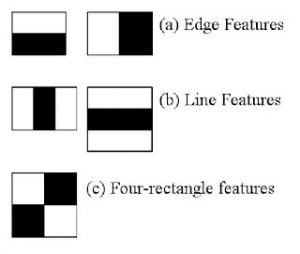 Figure 2 – Haar features of Rainer’s model
Now, a wide range of characteristics are calculated using all feasible sizes and positions for each kernel. Simply consider the amount of calculation required in a 24×24 window alone – there are more than 160000 characteristics. We must determine the total number of pixels under the white and black rectangles for each feature computation. They devised the integrated pictures to address this. It reduces the operation requiring more than four pixels to the sum of pixels computation, regardless of how many pixels there may be. This helps to accelerate the entire process.
However, the majority of the traits we calculate are irrelevant. For instance, think about the photo below. The top row demonstrates two positive qualities. The fact that the area around the eyes is darker than the area around the nose and cheeks seems to be the primary emphasis of the first trait chosen. The fact that the eyes are darker than the bridge of the nose is what led to the second feature being chosen.
It doesn’t matter if the same windows are applied to the cheeks or any other area. The question is, how do we then choose the finest features from the 160000+ features available? Adaboost makes it possible.
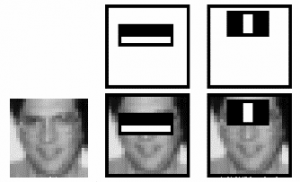 Figure 3 – Face detection using Rainer’s model
On all of the training images, we apply each and every characteristic for this. It determines the optimal threshold for each attribute to categorize the faces as positive or negative. There will undoubtedly be mistakes or incorrect classifications, though. We choose the features with the lowest error rate since they can distinguish between images with and without faces the best.
The procedure is not easy. In the beginning, the weight of each image is equal. The weights of photos that were incorrectly classified grow after each classification. The same procedure is followed again. The calculated error rates are new weights as well. The procedure is repeated until the appropriate accuracy, error rate, or number of features is discovered.
These weak classifiers are added together to form the final classifier. It is referred to as weak since, by itself, it is unable to categorize the image, but when combined with other classifiers, it can. Even 200 characteristics, according to the study, can detect objects with 95% accuracy. Nearly 6000 features made up their final arrangement. Consider a drop in features from 160000+ to 6000. It’s a significant gain.
Now, you snap a picture. Consider every 24×24 window. Give it 6000 features. Verify to see if it is a face. Isn’t it a little time-consuming and inefficient? It is, indeed. To address this challenge, authors have a practical answer.
The majority of an image’s region is made up of non-face areas. A straightforward way to determine if a window is a face region is therefore preferable. If it is not, throw it away all at once. Do not process it once more. Instead, concentrate on the area where a face might be. We will have more time to examine a potential face region if we do it this way.
They developed the idea of a cascade of classifiers to address this. Applying each of the 6000 features individually would be preferable compared to applying them all at once on a window (Initial stages often have a relatively small amount of features). Discard a window if it doesn’t pass the first test. We disregard any additional features on it. Apply the second stage of features and carry on with the process if it succeeds. Face region is the window that successfully completes all steps.
The authors’ detector had more than 6000 features in 38 stages, with the first five stages including 1, 10, 25, 25, and 50 features (The top two features in the image were really taken from Adaboost and are represented by those two features). The authors claim that each sub-window evaluates an average of 10 features out of more than 6000.
Let’s now get into the programming,
We need to do changes only in the publisher script, because subscriber is just displaying the image which is subscribed from the node.
Given below are the instructions to do the same.
Move to the folder:
cd ~/ros2_ws/src/cv_basics/cv_basics/
Edit the publisher script as shown below:
import rclpy

from rclpy.node import Node

from sensor_msgs.msg import Image

from cv_bridge import CvBridge

import cv2
class ImagePublisher(Node):
def __init__(self):
super().__init__(‘image_publisher’)
self.publisher_ = self.create_publisher(Image, ‘video_frames’, 10)
timer_period = 0.1 # seconds
self.timer = self.create_timer(timer_period, self.timer_callback)
self.cap = cv2.VideoCapture(0)
self.br = CvBridge()
def timer_callback(self):
ret, frame = self.cap.read()
font = cv2.FONT_HERSHEY_SIMPLEX
if ret == True:
frame1 = cv2.cvtColor(frame, cv2.COLOR_BGR2GRAY)
haar_cascade = cv2.CascadeClassifier(‘/home/nvidia/dev_ws/src/cv_basics/cv_basics/haarcascade_frontalface_default.xml’)
faces_rect = haar_cascade.detectMultiScale(frame1, 1.1, 9)
for (x, y, w, h) in faces_rect:
cv2.rectangle(frame, (x, y), (x+w, y+h), (0, 255, 0), 2)
cv2.putText(frame, ‘Face_detected’, (x,y-10), font,1, (255,0,0), 2, cv2.LINE_AA)
self.publisher_.publish(self.br.cv2_to_imgmsg(frame))
self.get_logger().info(‘Publishing video frame1’)
def main(args=None):
rclpy.init(args=args)
image_publisher = ImagePublisher()
rclpy.spin(image_publisher)
image_publisher.destroy_node()
rclpy.shutdown()
if __name__ == ‘__main__’:
main()
Running the ROS nodes
Finally, all the setup is done. Now let us check the output.
Open the terminal
cd ~/ros2_ws/

ros2 run cv_basics img_publisher
Open the other terminal
ros2 run cv_basics img_subscriber
As you can see below, a camera window will then pop up and you can see that face is detected
 Figure 4 – Face detection output
That concludes the steps involved in running a face detection algorithm on ROS2 foxy. For more details about the camera used, please visit the product page. To check out e-con Systems’ entire camera portfolio, explore our Camera Selector.
References
- Document referred for face detection: OpenCV Face Detection using Haar Cascades
As always, if you are looking for any help with camera selection and integration, please write to us at camerasolutions@e-consystems.com.

Vimal Pachaiappan works as a Computer Vision Engineer at e-con Systems. He holds a master’s degree from Vellore Institute of Technology. With 5 years of experience in embedded vision solutions, he is specialized in computer vision, robotics, IoT, AWS and AI. Currently Vimal is developing Vision based AI applications, and assisting customers for camera solutions with his expertise throughout the product development cycle.