



Streaming from a camera on Linux is a common requirement, especially for developers building embedded vision applications. In many cases, proprietary software solutions add licensing costs and limit flexibility, making it difficult to customize workflows for specific applications.
To overcome these challenges, we will demonstrate how to leverage popular open-source command-line tools. We will show how they help in capturing images and videos, configuring camera parameters, validating camera functionality, and streaming video over networks using e-con Systems’ USB camera.
Key takeaways:
- Increase USBFS memory for reliable 4K streaming
- Use v4l2-ctl to discover devices and configure camera controls
- Use GStreamer for advanced streaming, recording, and network transmission
- Use FFmpeg for media processing, recording, and image capture
- Use cvlc for lightweight command-line video streaming
e-con Systems provides QtCAM, an open-source Linux webcam software, to help users evaluate the performance of our USB cameras through a graphical user interface. It works with any v4l2-ctl-compatible cameras. In addition to QtCAM, several open-source command-line tools are available for evaluating and streaming e-con Systems’ USB cameras.
To showcase how this works, we used e-con Systems’ See3CAM_130 USB camera with an Ubuntu 20 PC for evaluation. However, these commands are applicable to any UVC-compliant USB camera connected to a Linux system.
Optimizing USB Camera Streaming Performance on Linux
Before evaluating or streaming high-resolution USB cameras, ensure the Linux system allocates sufficient USB buffer memory. High-resolution video streams, particularly 4K streams, require larger USB buffers to prevent frame drops and streaming instability. Increasing the USBFS memory pool helps improve streaming reliability and overall performance.
Increase USBFS memory for reliable 4K streaming
For reliable 4K USB camera streaming, e-con Systems recommends increasing the USBFS memory pool to 1000 MB.
- Run the following command to increase the USB transfer buffer limit to 1000 MB.
sudo sh -c 'echo 1000 > /sys/module/usbcore/parameters/usbfs_memory_mb'
- Run the following command to verify whether the USBFS memory pool size was updated successfully.
cat /sys/module/usbcore/parameters/usbfs_memory_mb
This command returns 1000.
- Run the following command to make the USB transfer buffer limit 1000 MB
sudo vim /etc/default/grub
- Edit the line GRUB_CMDLINE_LINUX_DEFAULT=”quiet splash” into.
GRUB_CMDLINE_LINUX_DEFAULT="quiet splash usbcore.usbfs_memory_mb=1000"
- Save the file and exit by pressing Esc, then type :wq.
- Run the following command to update the GRUB.
sudo update-grub

sudo reboot
- Run the following command to again verify whether the USBFS memory pool size has been updated successfully once the reboot is completed.
cat /sys/module/usbcore/parameters/usbfs_memory_mb
This command returns 1000.
v4l2-ctl
v4l2-ctl is a command-line utility for Linux that controls and configures video devices via the Video4Linux2 (V4L2) framework. It allows users to view the connected cameras, supported formats and frame rates, configure camera controls, capture images, and validate video streaming pipelines.
It is always recommended to refer to the respective cameras’ product datasheet to check supported output formats and FPS. Run the following commands to evaluate the cameras with v4l2-ctl.
Install v4l2-ctl
To install the v4l2-ctl, run the following commands.
sudo apt update

sudo apt install v4l-utils
List Connected Cameras
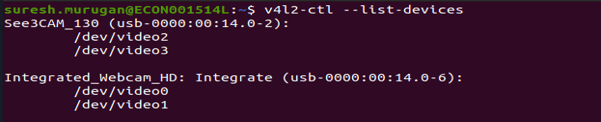
To list the connected cameras and their associated video nodes, run the following command.
v4l2-ctl --list-devices
This command displays the camera name along with its corresponding video device node, as shown below.
 Stream Camera
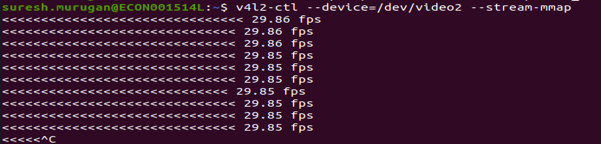
To stream the camera and to check whether it outputs frames, run the following command.
v4l2-ctl --device=/dev/video2 --stream-mmap
 View Supported Formats and Frame Rates
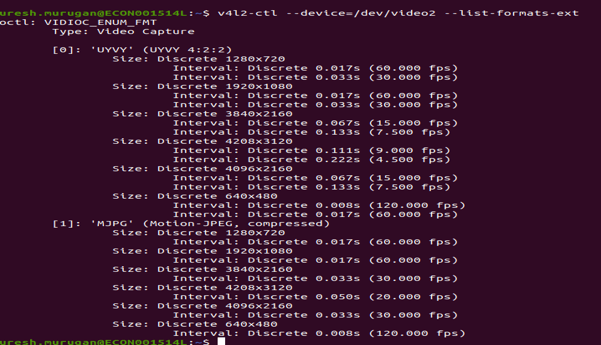
To view the supported formats and frame rates, run the following command.
v4l2-ctl --device=/dev/video2 --list-formats-ext
This command lists all supported resolutions, pixel formats, and frame rates.
 Stream with Specific Resolution and Format
To stream the camera with the selected format and FPS, run the following command.
v4l2-ctl --device=/dev/video2 --set-fmt-video=width=640,height=480,pixelformat=MJPG --stream-mmap
Set Frame Rate
To set the frame rate, run the following command.
v4l2-ctl --device=/dev/video2 --set-parm=30
Capture Raw Images
To capture the images in raw format, run the following command.
v4l2-ctl --device=/dev/video2 --set-fmt-video=width=640,height=480,pixelformat=UYVY --stream-mmap --stream-to=frame.raw --stream-count=1
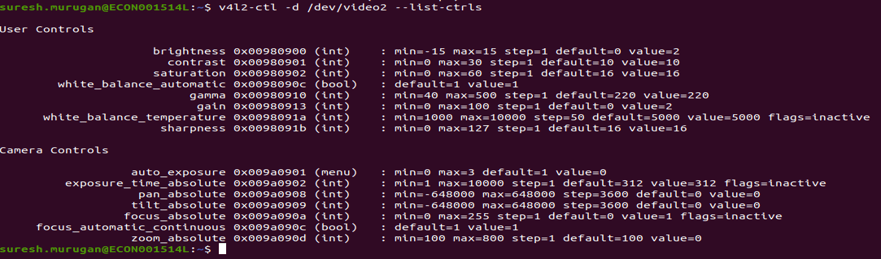
List Cameras Controls
To list the camera controls, run the following command.
v4l2-ctl -d /dev/video2 --list-ctrls
This command lists the cameras’ controls along with their values.
 Modify Camera Controls
The user can modify all camera-supported controls in the camera.
As an example, the modification of brightness and contrast controls is shown below.
Run the following commands to set brightness and contrast controls.
v4l2-ctl -d /dev/video2 --set-ctrl=brightness=150

v4l2-ctl -d /dev/video2 --set-ctrl=contrast=170
Modify Exposure Controls
HDR cameras
In HDR cameras, HDR is on by default, so manual exposure won’t have any impact, e.g., See3CAM_CU81. The user needs to switch the cameras to Linear mode by using the QtCAM application, then set the manual exposure mode to adjust exposure manually.
Non-HDR cameras
Run the following command to adjust the exposure in non-HDR cameras, change the auto exposure to manual exposure, and adjust the exposure time.
v4l2-ctl -d /dev/video2 --set-ctrl=exposure_auto=1

v4l2-ctl -d /dev/video2 --set-ctrl=exposure_time_absolute=200
To check whether the control values have been reflected or not, run the following command.
v4l2-ctl -d /dev/video2 --list-ctrls
Display Complete Camera Information
To get the complete details of the camera parameters, including driver name, format, control values and streaming parameters, run the following command.
v4l2-ctl --device=/dev/video2 --all
Monochrome Cameras
To capture grayscale video frames, run the following command.
v4l2-ctl --device=/dev/video2 --set-fmt-video=width=640,height=480,pixelformat=GREY --stream-mmap
To stop the streaming, press Ctrl + C.
So far, we have seen some of the basic commands we use with v4l2-ctl. Next, we can proceed using GStreamer.
GStreamer:
GStreamer is a powerful open-source multimedia framework used to build pipelines for handling audio and video processing on Linux. It supports capturing, encoding, decoding, streaming, and playback across a wide range of formats and devices.
Install GStreamer
To install GStreamer (gst-launch-1.0) with all plugins, including Good, Bad, and Ugly, run the following command.
sudo apt update && sudo apt install -y v4l-utils gstreamer1.0-tools gstreamer1.0-plugins-base gstreamer1.0-plugins-good gstreamer1.0-plugins-bad gstreamer1.0-plugins-ugly gstreamer1.0-libav
Stream Cameras without Parameters
To stream the cameras without parameters, run the following command.
gst-launch-1.0 v4l2src device=/dev/video2 ! videoconvert ! autovideosink
List Supported Pixel Formats and FPS
To list the supported formats and FPS, run the following v4l2-ctl command.
v4l2-ctl --device=/dev/video2 --all
To stream UYVY 1280*720, run the following command.
gst-launch-1.0 v4l2src device=/dev/video2 ! video/x-raw,format=UYVY,width=1280,height=720,framerate=60/1 ! videoconvert ! autovideosink
To stop streaming, press Ctrl+C
Monochrome Cameras:
To capture grayscale video frames, run the following command.
gst-launch-1.0 v4l2src device=/dev/video2 ! video/x-raw,format=GRAY8,width=1280,height=720,framerate=12/1 ! videoconvert ! autovideosink
MJPEG Streaming
To stream MJPEG video and display the real-time frame rate (FPS), run the following command.
gst-launch-1.0 v4l2src device=/dev/video2 ! image/jpeg,width=1920,height=1080,framerate=60/1 ! jpegdec ! videoconvert ! fpsdisplaysink video-sink=autovideosink sync=false
Camera Controls
To adjust camera controls in GStreamer, follow one of the following options:
- Run a bash script with v4l2-ctl in parallel to adjust the controls, then stream the cameras separately using GStreamer.
- Include the camera control adjustment in GStreamer itself by including the controls in the Pipeline, as shown below.
Syntax: extra-controls=”c,<control>=<value>,<control>=<value>”
gst-launch-1.0 v4l2src device=/dev/video2 extra-controls="c,auto_exposure=1,exposure_time_absolute=100" ! image/jpeg,width=1920,height=1080,framerate=60/1 ! jpegdec ! videoconvert ! fpsdisplaysink video-sink=autovideosink sync=false
Record Videos
To record 4K H.264 videos for encoding, run the following command.
gst-launch-1.0 -e v4l2src device=/dev/video2 io-mode=2 ! video/x-raw,format=UYVY,width=3840,height=2160,framerate=15/1 ! videoconvert ! x264enc bitrate=8000 speed-preset=ultrafast tune=zerolatency ! mp4mux ! filesink location=1080p_video2_uyvy.mp4
To scale 4Kto a 1080P pipeline, run the following command.
gst-launch-1.0 -e v4l2src device=/dev/video2 io-mode=2 ! video/x-raw,format=UYVY,width=3840,height=2160,framerate=15/1 ! videoconvert ! videoscale ! video/x-raw,width=1920,height=1080 ! x264enc bitrate=8000 speed-preset=ultrafast tune=zerolatency ! mp4mux ! filesink location=1080p_scaled.mp4
Capture Images
To capture images in UYVY Raw format, run the following command.
gst-launch-1.0 -e v4l2src device=/dev/video2 num-buffers=1 io-mode=2 ! video/x-raw,format=UYVY,width=3840,height=2160 ! filesink location=single_4k_uyvy.raw
The captured raw image can be viewed using tools such as 7yuv. Alternatively, the user can convert the UYVY raw file directly to a PNG image using FFmpeg by running the following command.
ffmpeg -f rawvideo -pixel_format uyvy422 -video_size 3840x2160 -i single_4k_uyvy.raw output.png
To capture directly in 4K PNG format, run the following command.
gst-launch-1.0 -e v4l2src device=/dev/video2 num-buffers=1 io-mode=2 ! video/x-raw,format=UYVY,width=3840,height=2160 ! videoconvert ! pngenc ! filesink location=single_4k.png
To continuously capture 4K images, run the following command.
gst-launch-1.0 -e v4l2src device=/dev/video2 io-mode=2 ! video/x-raw,format=UYVY,width=3840,height=2160,framerate=15/1 ! videorate ! video/x-raw,framerate=1/1 ! queue ! videoconvert ! pngenc ! multifilesink location="frame_%05d.png"
During continuous image capture, the camera takes time to settle focus in autofocus mode, so the first few images may appear blurry in both single and continuous modes.
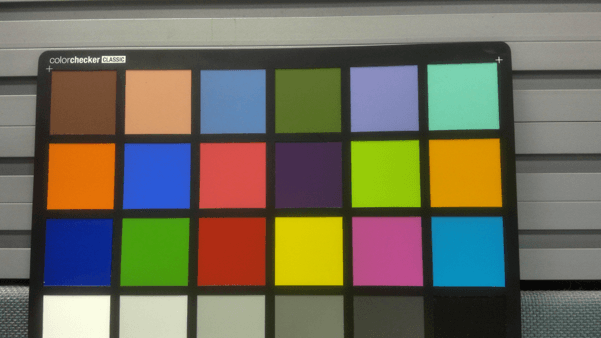
The image below shows the streaming output from the e-con Systems’ See3CAM_130 USB camera.
 To debug buffer allocation and streaming-related issues, run the following command.
GST_DEBUG=v4l2*:6 gst-launch-1.0 v4l2src device=/dev/video2 ! fakesink
gst-launch-1.0 v4l2src device=/dev/video2 io-mode=4 ! video/x-raw ! Fakesink
Network Streaming
Ensure that both the sender and receiver systems are connected to the same network and subnet before running the network streaming pipelines.
Sender:
gst-launch-1.0 -e v4l2src device=/dev/video2 ! video/x-raw,width=640,height=480,framerate=60/1 ! videoconvert ! x264enc tune=zerolatency bitrate=3000 speed-preset=ultrafast key-int-max=30 ! video/x-h264,profile=baseline ! rtph264pay config-interval=1 pt=96 ! udpsink host=192.168.31.168 port=5000
Receiver:
gst-launch-1.0 -e udpsrc port=5000 caps="application/x-rtp,media=video,encoding-name=H264,payload=96" ! rtpjitterbuffer latency=50 ! rtph264depay ! h264parse ! avdec_h264 ! videoconvert ! ximagesink sync=false
Timestamp command:
v4l2-ctl --device=/dev/video2 --stream-mmap --stream-count=5 --verbose
We have covered some useful basic GStreamer commands; let’s look at FFmpeg and cvlc command-line tools.
FFmpeg
FFmpeg is a widely used open-source multimedia framework for recording, converting, streaming, and processing audio and video files. It supports different codecs and formats, making it a powerful tool for media transcoding and analysis.
Install ffmpeg
To install ffmpeg with maximum codec and filter support, run the following commands.
sudo apt install software-properties-common

sudo add-apt-repository ppa:savoury1/ffmpeg4

sudo apt update

sudo apt install ffmpeg
Stream Cameras
To stream the cameras in 4K, run the following commands.
ffmpeg -f v4l2 -input_format uyvy422 -framerate 15 -video_size 3840x2160 \

-i /dev/video2 -vf format=yuv420p -f sdl "4K Preview"
Alternatively, to stream the camera using ffplay, a simple media player that uses the FFmpeg libraries, run the following command.
ffplay -f v4l2 -input_format uyvy422 -framerate 15 -video_size 3840x2160 /dev/video2
To stream along with overlay prints, including frame number, PTS, resolution, and pixel format, run the following command.
ffplay -f v4l2 -input_format mjpeg -video_size 1920x1080 -framerate 30 -i /dev/video2 -vf showinfo
Record Videos
To record videos in MJPEG format and save them as MKV, run the following command.
ffmpeg -f v4l2 -thread_queue_size 4096 -use_wallclock_as_timestamps 1 -fflags +genpts -input_format mjpeg -video_size 1920x1080 -framerate 60 -i /dev/video2 -c:v copy output_test.mkv
For 4K:
ffmpeg -f v4l2 -thread_queue_size 4096 -use_wallclock_as_timestamps 1 -fflags +genpts -input_format mjpeg -video_size 3840x2160 -framerate 15 -i /dev/video2 -c:v copy output_4k_15fps.mkv
For UYVY recording:
ffmpeg -f v4l2 -thread_queue_size 4096 -use_wallclock_as_timestamps 1 -fflags +genpts -input_format uyvy422 -video_size 1920x1080 -framerate 30 -i /dev/video2 -c:v libx264 -preset veryfast -profile:v high422 -pix_fmt yuv422p output_4k_422.mp4
For 4K continuous image capture:
ffmpeg -f v4l2 -thread_queue_size 4096 -use_wallclock_as_timestamps 1 -fflags +genpts -input_format mjpeg -video_size 3840x2160 -framerate 15 -i /dev/video2 frame_%05d.jpg
cvlc
cvlc is the command-line interface (CLI) version of VLC media player. It supports every audio and video format without requiring additional codecs. It allows playing media files from the terminal, streaming audio/video over the network, converting media formats and broadcasting live streams without a GUI.
Install cvlc
To install cvlc, run the following commands.
sudo apt update

sudo apt install vlc –y
To verify the installed version of the cvlc, run the following command.
cvlc –version
For UYVY streaming, run the following command.
cvlc v4l2:///dev/video2:chroma=UYVY:width=1920:height=1080:fps=60
For MJPEG streaming, run the following command.
cvlc v4l2:///dev/video2:chroma=MJPG:width=1920:height=1080:fps=60 --live-caching=50 --network-caching
Summary
e-con Systems USB cameras are designed to work seamlessly with QtCAM, a sample application, and popular open-source command-line tools. This enables developers to rapidly evaluate camera performance and deploy vision solutions with confidence. By leveraging open-source tools, they can quickly validate camera functionality and build streaming workflows without relying on proprietary software.
e-con Systems’ High-Performance USB cameras
Since 2003, e-con Systems has been designing, developing, and manufacturing embedded vision solutions, ranging from OEM cameras to complete ODM platforms.
Our USB cameras are easily accessible to popular open-source command-line tools. We also offer a wide range of cameras with different interfaces, including GMSL-III, FPD-Link IV, MIPI, and Ethernet.
Explore e-con Systems’ complete portfolio using our Camera Selector and find the right camera for your embedded vision application.
For camera-related questions specific to your application, you can reach out to us at camerasolutions@e-consystems.com.
Prabu is the Chief Technology Officer and Head of Camera Products at e-con Systems, and comes with a rich experience of more than 15 years in the embedded vision space. He brings to the table a deep knowledge in USB cameras, embedded vision cameras, vision algorithms and FPGAs. He has built 50+ camera solutions spanning various domains such as medical, industrial, agriculture, retail, biometrics, and more. He also comes with expertise in device driver development and BSP development. Currently, Prabu’s focus is to build smart camera solutions that power new age AI based applications.