Introduction:
Many feel that writing an application in Windows Embedded Compact 2013 is difficult especially many MCU application developer feel it is difficult to write an app compared to writing an application for MCU. . This article will cover how to easily develop an application in windows embedded compact 2013 with an example. Here we have taken the readily available Almach – e-con development kit that has board, BSP and SDK for OMAP35XX. It is a ready to start device.
Basic Requirement:
Visual Studio 2012
Almach Development Kit – ready to start kit
Almach SDK – This contains all the library and header files that are required for application development
Sample Application:
I am going to control the camera register (OV5640) from Application. This is my test application so that we can know how to access the hardware and how easy as like writing a MCU application.
Creating a New Application
Create a new application using the Visual Studio 2012 as shown below
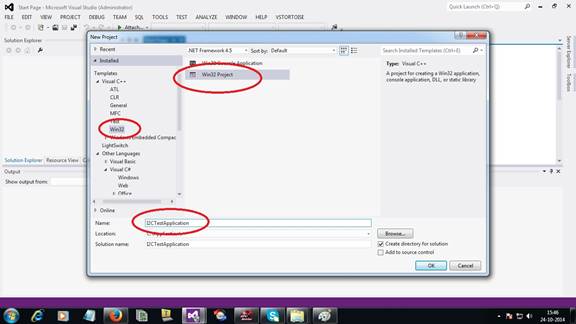
Select the option “Windows Application” in the application type, this will create an application with basic stuffs filled as shown below
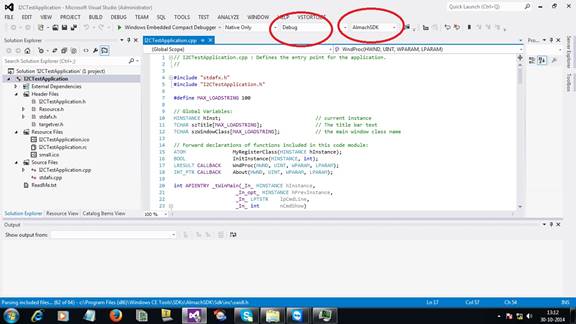
Please make sure you select the “AlmackSDK” . When we install the “AlmackSDK.msi” you will get this option. This is the SDK which contains all the library and header files required for application development.
Application and Driver Link – API Library and Header File
Now the application is created. Next step using the API library and its header file. There can be different library and header file for each hardware control. Currently we need “eSOMAPI_I2C.lib” and “eSOMAPI_I2C.h” to access any I2C device in the ESOM using the I2C API. Since we have already installed the AlmackSDK all these files are included in that. So including the “eSOMAPI_I2C.h” file name in the “CPP” file alone is enough.
API calling from Application
Basically we expose following I2C API using which we can control I2C devices
- EsomI2CDrvrOpen
- EsomI2CDrvrClose
- EsomI2CReadData
- EsomI2CWriteData
- EsomI2CSetSlaveAddress
- EsomI2CSetSubAddressMode
- EsomI2CSetBaudIndex
- EsomI2CSetTimeOut
Sample Code
#define I2C_INDEX_OFFSET 2
#define I2C_SUBADD_OFFSET 1
HANDLE g_i2chandle;
DWORD I2C_Index = 1, SubAddressMode, BaudRate;
UINT8 SlaveAddress = 0;
DWORD read_address;
UINT8 read_data;
DWORD write_address,write_data;
DWORD TimeOutValue;
CONFIGURE:
g_i2chandle =EsomI2CDrvrOpen(I2C_Index+I2C_INDEX_OFFSET);
SubAddressMode = 1;
EsomI2CSetSubAddressMode(g_i2chandle,SubAddressMode+I2C_SUBADD_OFFSET);
BaudRate = 100;
EsomI2CSetBaudIndex(g_i2chandle,BaudRate);
SlaveAddress = 0x0
EsomI2CSetSlaveAddress(g_i2chandle,SlaveAddress);
NKDbgPrintfW(L”Gonna set time out \r\n”);
TimeOutValue =500 ; // 500 ms
EsomI2CSetTimeOut(g_i2chandle,(TimeOutValue+1)*500);
WRITE:
write_address= 0x3A;
write_data=0xFF;
EsomI2CWriteData(g_i2chandle,write_address,&write_data,1);
READ:
read_address= 0x3A
EsomI2CReadData(g_i2chandle,read_address,&read_data,1);
That’s it, very simple to access any I2C device that is present in the Almach. We can easily create simple GUI application as show below:
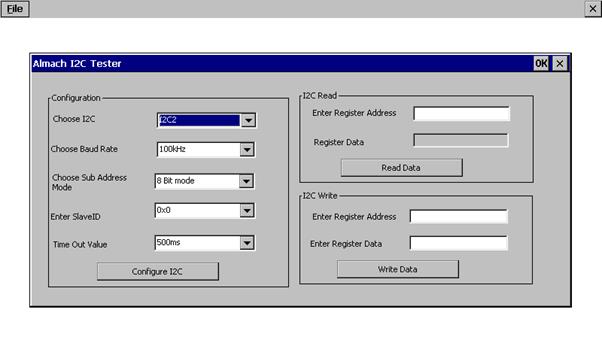
e-con also provides various sample applications in a simple manner so that any person can start the Application development immediately.