Many of windows ce developer might have noted that your WinCE 6.0 DirectShow camera application was not working with Windows Embedded Compact 7 (WinCE 7). The reason is “In the newly launched Windows Embedded Compact 7 OS, the Video Mixing Renderer (VMR) filter replaces the DirectShow Video renderer filter as a default video renderer”.
In this post I will try to give basic idea to start writing the Simple DirectShow Camera application on WinCE 7 and also “How to” start with the newly added component in WinCE 7(i.e., Video Mixing Renderer (VMR)).
One more important thing is Windows Embedded CE 6.0 DirectShow camera Application will not work on Windows Embedded Compact (WinCE 7) without the changes which I had done below.
The Video Mixing renderer included in WinCE 7 is a stripped version of Desktop Windows VMR-7 filter. To know the difference between the VMR of WinCE 7 and VMR-7 of Desktop windows,check out the following msdn link.
https://msdn.microsoft.com/en-us/library/gg156881.aspx
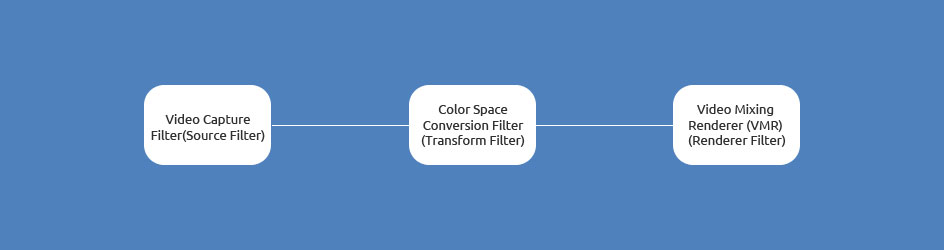
Now I will show how to build a simple filter graph for showing the preview on a window using VMR on WinCE 7.Here is how the basic filter graph will look like. We will build a filter graph like this with Camera as source filter and VMR as renderer filter.
As a first step we need to create a COM object for the Capture graph builder and filter graph manager.

| ********************************************************************************* // 1. Create the capture graph builder and register the filtergraph manager. ********************************************************************************* CHK( m_pCaptureGraphBuilder.CoCreateInstance( CLSID_CaptureGraphBuilder )); CHK( pFilterGraph.CoCreateInstance( CLSID_FilterGraph )); CHK( m_pCaptureGraphBuilder->SetFiltergraph( pFilterGraph )); |
Also refer the following MSDN link for detailed explanation of this step.
https://msdn.microsoft.com/en-us/library/ee496112%28v=winembedded.60%29.aspx
Once we created object for filter graph, we will move on to create the COM objects for our Source and renderer filter.
Now to create the COM object for source filter(i.e.,Video Capture Filter) using the Video Capture CLSID.
| ********************************************************************************* // 2. Create and initialize the video capture filter ********************************************************************************* CHK( m_pVideoCaptureFilter.CoCreateInstance( CLSID_VideoCapture )); CHK( m_pVideoCaptureFilter.QueryInterface( &pPropertyBag )); |
And we need load our camera driver to the Video capture filter, since we are going to use camera as a source filter.
| ********************************************************************************* // We are loading the driver CAM1 in the video capture filter. *********************************************************************************CHK( GetFirstCameraDriver( wzDeviceName )); varCamName = wzDeviceName; if( varCamName.vt != VT_BSTR ) { ERR( E_OUTOFMEMORY ); } CHK( PropBag.Write( L”VCapName”, &varCamName )); CHK( pPropertyBag->Load( &PropBag, NULL )); |
Once all the above calls succeeded means then we can add our “Video Capture Source Filter” to the filter graph.
| ********************************************************************************* // Everything succeeded, now adding the video capture filter to the filtergraph ********************************************************************************* CHK( pFilterGraph->AddFilter( m_pVideoCaptureFilter, L”Video Capture Filter Source” )); |
Now the source filter is ready and added to the Filter Graph. We can move on to the next one Renderer Filter.
| ********************************************************************************* //3. Create and add the Video Renderer Filter to the Filter Graph *********************************************************************************CHK( pVideoRenderer.CoCreateInstance( CLSID_VideoMixingRenderer )); //Add the Video Mixing Renderer to the Filter Graph CHK( pFilterGraph->AddFilter( pVideoRenderer, L”VideoMixingRenderer” ));
|
After adding both the Source and renderer filter to the Graph,we need to connect the Source filter and renderer filter using the RenderStream.Here for Transform or Intermediate filter parameter I had passed NULL so that filter graph will automatically connect the corresponding intermediate filter(i.e. Color Space Conversion Filter) if it requires.
| ********************************************************************************* //4. Now render the Graph with Video Capture and Video renderer Filter. *********************************************************************************CHK( m_pCaptureGraphBuilder->RenderStream( &PIN_CATEGORY_CAPTURE, &MEDIATYPE_Video, m_pVideoCaptureFilter, NULL, pVideoRenderer )); |
If the above call succeeds then the filter graph is connected. Now we will specify some of the parameters like
(i)the window where we want to render our output and
(ii)in which region of LCD screen(Window) we want renderer to output.
| ********************************************************************************* //5. Query the VideoWindow interface to set the preview rendering window size. *********************************************************************************CHK( pFilterGraph->QueryInterface( &m_pVideoWindow )); if(m_pVideoWindow) { // if the user gave a valid owner window, then set it. otherwise don’t. if(m_hwnd) { // configure the video window hr = m_pVideoWindow->put_Owner((OAHWND) m_hwnd); if(FAILED(hr)) { NKDbgPrintfW(TEXT(“BuildCaptureGraph: Setting the owner window failed.\r\n”)); } } m_rcLocation.left = (GetSystemMetrics(SM_CXSCREEN)/2) – (CAMERA_PREVIEW_WIDTH/2); m_rcLocation.right = m_rcLocation.left + CAMERA_PREVIEW_WIDTH; m_rcLocation.top = (GetSystemMetrics(SM_CYSCREEN)/2) – (CAMERA_PREVIEW_HEIGHT/2) – 36; m_rcLocation.bottom = m_rcLocation.top + CAMERA_PREVIEW_HEIGHT; // if the user gave a valid location rectangle to set, then set it, otherwise don’t set it and we’ll just use the default. if(m_rcLocation.left> 0 || m_rcLocation.top> 0 || m_rcLocation.right> 0 || m_rcLocation.bottom> 0) { hr = m_pVideoWindow->SetWindowPosition(m_rcLocation.left, m_rcLocation.top, m_rcLocation.right – m_rcLocation.left, m_rcLocation.bottom – m_rcLocation.top); if(FAILED(hr)) { NKDbgPrintfW(TEXT(“BuildCaptureGraph: Setting the window position failed.\r\n”)); } } // update our internal location rectangle to reflect what is set in the system. // the position set may be different if the position requested isn’t possible. hr = m_pVideoWindow->GetWindowPosition(&m_rcLocation.left, &m_rcLocation.top, &m_rcLocation.right, &m_rcLocation.bottom); if(FAILED(hr)) { NKDbgPrintfW(TEXT(“BuildCaptureGraph: Setting the window position failed.\r\n”)); } } |
Finally we need to query the interface object for IMediaControlin order to control the Filter graph Run, Stop actions.
| ************************************************ // Get the media control interface for controlling the connected graph ************************************************ CHK( pFilterGraph->QueryInterface( &m_pMediaControl )); |
Now after connecting the filters (i.e, Source, Renderer Filter) into the Filter Graph, we need to RUN the graph to start the streaming action. This can be done using the following action
| ************************************************ //Run the Graph ************************************************ CHK( m_pMediaControl->Run()); |
After this action the filter graph will start to stream the camera output in to the LCD screen with the dimension mentioned above using SetWindowPosition().
To stop the running graph use the following call
| ************************************************ //Stop the Graph ************************************************CHK( m_pMediaControl->Stop()); |
Here I am giving you the sample source with this post which can be used as a base to start with the DirectShow application on Windows Embedded Compact 7. This sample application is compiled for OMAP35x EVM SDK, which can be easily ported to your SDK build for your platform. Also please look for this blog in future to know more about the VMR on WinCE 7.